CMM measurement uncertainty estimation: Relevant uncertainty contributors
CMM measurement uncertainty estimation: Relevant uncertainty contributors

Traceability is the ultimate goal of any types of measurements. To have a traceable measurement, in this case length measurement, that is traceable until the definition of metre, uncertainty of measurement results needs to be quantified.
ISO15530 series to estimate measurement uncertainty of coordinate measuring machine (CMM) measurement results are based on GUM standard. ISO15530 specifically addresses relevant uncertainty contributorsrelated to CMM measurements.
In this post, we will start by explaining what relevant uncertainty contributors are for CMM measurement uncertainty estimation.
Let us discuss it!
READ MORE: The fundamental concept of metrology

ISO15530 series for uncertainty estimation of CMM measurement results
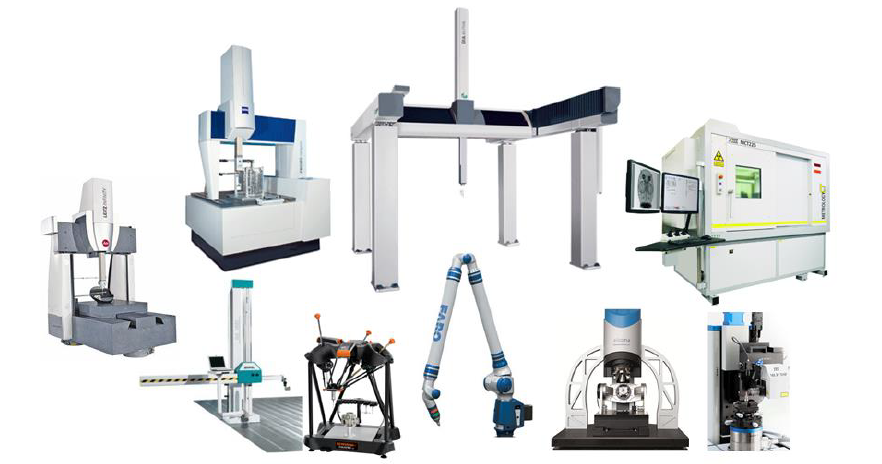
The method to estimate uncertainty of CMM measurement results by using ISO15530 series is specifically designed to be applied for CMM measurements, both by tactile (contact) or optical (non-contact) CMMs, including CMM using X-ray methods.
Figure 1 below shows various types of tactile and optical as well as X-ray CMMs that can implement ISO15530 series to estimate their measurement uncertainty.
The ISO15530 series are based on GUM method. In addition, the concept of ISO15530 series can be applied to other type of measurements as well with some modifications, especially for specific uncertainty contributors.
The format of ISO15530 follows spread-sheet method (ISO15530-2 and ISO15530-3) as well as Monte-Carlo method (ISO15530-4).
ISO15530-2 and ISO15530-3 methods have a spreadsheet format that includes relevant uncertainty contributors specific to measurements by using CMMs, both tactile and optical. Meanwhile, ISO15530-4 method is based on Monte-Carlo method that requires sampling of a measured surface by a CMM once and then simulations applied to the sampled points.
The methods of ISO15530 series, especially ISO15530-3, are the most used uncertainty estimation method in industry. Because CMMs have become a standard instrument for dimensional and geometrical measurement industry.

CMM uncertainty contributors
Before we can discuss and understand ISO15530 series to estimate CMM measurement uncertainties, we first need to understand what the relevant uncertainty contributors are and how they affect the total CMM measurement uncertainties.
Figure 2 below shows the main relevant contributors to estimate CMM measurement uncertainty. These contributors are firstly presented in a paper [1].
In figure 2, the uncertainty contributors are presented and described as how they compound each other and then propagate to the total uncertainty of a CMM measurement.
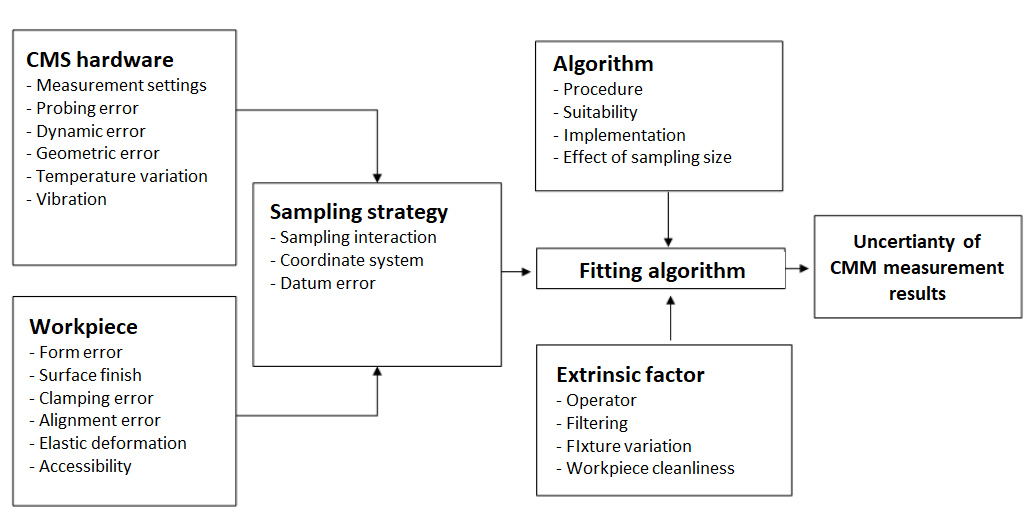
Based on figure 2 above, the relevant uncertainty contributors for CMM measurements are:
Coordinate measuring system (CMS) hardware
Uncertainty contributors that come from the hardware of a CMS include measurement settings used for measurement (such as measuring speed, scanning speed and probing force on a measured surface), CMM geometric error, dynamic error as well as probing error.
In addition, the effect of environment to a CMM machine also contribute to CMM measurement uncertainties. For example, the temperature variation where a CMM measurement is performed. This temperature variation will affect the expansion of the components of a CMM. Noise from vibration, such as ground vibration also affect the performance of a CMM and hence also contributes to CMM measurement uncertainties.
Workpiece
Relevant uncertainty contributors related to a workpiece to be measured include geometrical defects on a measured workpiece.
Some examples of the defects on a workpiece that affect the CMM measurement uncertainty are geometrical defects (for example flatness error, roundness error and cylindricity error), surface finish quality (the rougher the surface, the more uncertainty it can contribute), workpiece clamping error (for example, too large clamping force will cause a workpiece to bend and distort the workpiece geometry), alignment error (for example, the mistake in choosing a correct coordinate system to operate), elastic deformation of a part due to clamping force as mentioned before) and sensor or stylus accessibility (for example, when a stylus tip cannot access or reach a certain portion of a measured surface, the number of sampled points for the measured surface will be less and then will affect the uncertainty due to the lack of points to process).
Sampling strategy
Especially for tactile (contact) CMM, a sampling strategy will significantly affect measurement uncertainties.
This uncertainty contribution occurs because a sampling strategy will directly affect whether a CMM can sufficiently sampled defected area on a measured surface.
If the sampling points cannot cover sufficiently area on a surface to be measured, the measurement results become highly uncertain. This defect covering is very vital for geometrical measurements, such as flatness and roundness.
This is the reason why sampling strategy is a very relevant uncertainty contributor. Because this strategy is directly related to how many points and where to sample the points on a measured surface. These sampled points will determine the reconstructed geometry form which a measurement will be derived.
Fitting algorithm
Fitting process is the final step to be able to derive a measurement result from points sampled from a measured surface by using a CMM.
Fitting process is a mathematical process to associate a geometry, for example a circle, from sampled points and then derived a measurement, for example, the diameter of the circle.
There are two aspects to consider in fitting process:
- Algorithm
The types of fitting algorithm for each type of measurement will directly affect measurement result calculations.
For example, for geometrical inspections, the correct fitting algorithm is minimum-zone fitting (MZ) instead of least square fitting (LSQ).
In addition, the results from a fitting process will also depend on how many sample points are obtained from a CMM measurement.
- Intrinsic factors
Very often, intrinsic factors that affect uncertainty contribution due to algorithm are usually neglected. In fact, these intrinsic factors significantly affect measurement results.
For example, the skill level of an operator to operate a CMM machine, the type of data filtering method selected by the operator to calculate a measurement, the way the operator position and clamp a workpiece before measurement, the cleanliness of the surface of a measured workpiece (because, in microscale, even dust will affect measurement results).
READ MORE: Tactile CMM: The reference of dimensional and geometrical measuring machine in industry
Conclusion
In this post, relevant uncertainty contributors for CMM measurements have been presented and discussed.
These relevant uncertainty contributors are presented in a flow chart to see the specific area where these contributors occur and affect the total CMM measurement uncertainties.
By knowing these relevant uncertainty contributors, we can perform a CMM measurement with care to avoid or minimise these contributors and then to reduce the total measurement uncertainty.
The next several post, we will discuss in detail ISO15530 part 2, part 3 and part 4.
References
[1] Wilhelm, R.G., Hocken, R. and Schwenke, H., 2001. Task specific uncertainty in coordinate measurement. CIRP annals, 50(2), pp.553-563.
You may find some interesting items by shopping here.
