General benefits when the variation transformation chain of an assembly is known
This post will show general advantages if we have the tolerance stack-up model or the variation transformation chain of an assembly.
This post will show general advantages if we have the tolerance stack-up model or the variation transformation chain of an assembly.
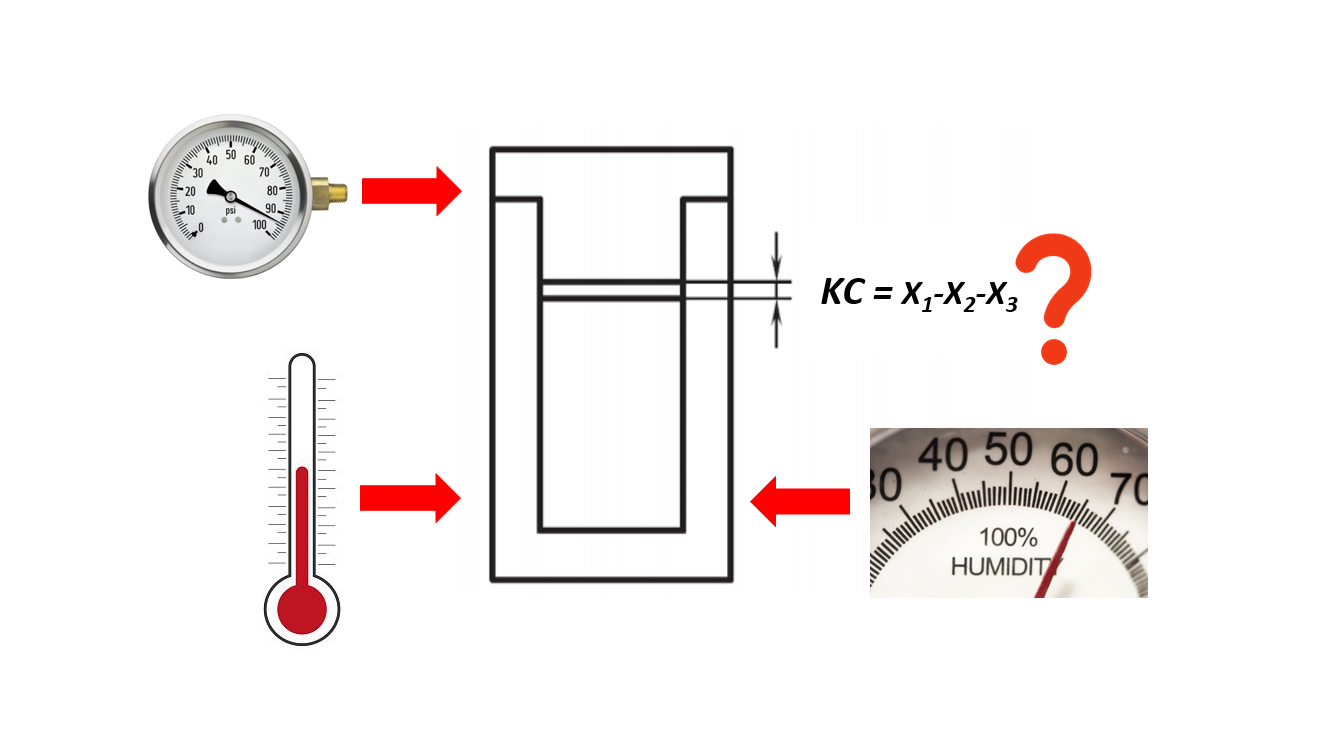
Later at the end of this post, we will have a real example on how the variation transformation chain can be used to study the environment effects, such as temperate, pressure and humidity to the key characteristic (KC) of an assembly.
From this example, readers can have a clarity of the advantages of having the variation transformation chain of an assembly.
The advantages are:
Tolerance stack-up analysis can be performed
This tolerance stack-up analysis is the main and fundamental advantage of having the variation transformation chain of an assembly.
With this analysis, the variation of the key characteristic (KC) of an assembly can be performed even before the parts of the assembly are manufactured. The analysis is only based on the assigned tolerance types and values and other additional information.
To perform the variation analysis of the KC, both nominal and variation transformation chains of the assembly have to be determined.
Also, from this analysis, problem or error sources of an assembly can be evaluated and predicted to improve the part and assembly designs.
The solutions of the found problems or errors can be a complete or partial re-design to reduce number of components or using appropriate assembly features, a re-allocation of feature tolerances or both re-design the parts and re-allocate the tolerances.
The environment effects to the accuracy of an assembly process can be analysed
The effect of environmental variations to an assembly process (the KC of the assembly) can be analysed when we have the nominal and variation transformation chain (the tolerance stack-up model) of an assembly.
Information regarding the material properties of parts constituting an assembly can be incorporated into the variation transformation chain to analyse the effect of temperature variation of the environment where the assembly process is performed.
Specifically for the assembly of precision assembly, where the tolerance of the KC can be in micro-metre or higher level, for example, the assembly of a mechanical watch, aerospace engine assembly or precision robot assembly, part variations due to temperature variation have a significant effect.
The main question to answer by doing this temperature variation analysis is to understand at what temperature range the assembly of, for example, an aero-jet plane engine or power plant can be done.
Another information affecting an assembly process is, for example, information regarding the deformation behaviour of parts due to an external loading.
By taking into account this deformation behaviour of the parts into the variation transformation chain of the parts’ assembly, the deformation effect to the assembly process can be estimated, for example, in automotive assembly, aerospace assembly, gearbox assembly and mechanical watch assembly.
Process capability of an assembly process can be performed
The variation sources of parts constituting an assembly can be correlated to the process capability of the manufacturing processes used to make the parts.
Hence, we can allocate tolerance values to the parts according to production machines that we use to manufacture the parts.
For example, we can allocate a relatively large value of tolerance for production machine that does not have a relatively large precision. And, we can compensate this a large tolerance value by giving a relatively a small tolerance value for parts that are manufactured with high precision production machines.
By doing this tolerance allocation balancing, variations from the small tolerance values will compensate variations from the large tolerance values so that final variations on the final KC of the assembly will be achieved.
Selection of the best measuring instruments to verify an assembly and its parts can be carried out
If the variation of an assembly process can be estimated, then this estimation can be used to determine what the most appropriate measuring instrument is for verifying the tolerance of the final KC of the assembly and for verifying tolerance given to the parts constituting the assembly.
For example, we can decide what level of the accuracy of a coordinate measuring machine (CMM) we can use to measure the parts and the assembly’s KC.
If we incorrectly use a measuring instrument to verify the KC, then, we cannot get valid data to decide whether the KC is within or outside conformance with respect to the given KC’s tolerance.
Error budgeting of an assembly process can be quantified
The error budgeting of a product design can be and should be done at the design stage before the manufacturing processes of the designed parts are performed.
In essence, the tolerance stack up model of an assembly is basically an error budgeting model.
With this error budgeting, fundamental mistakes on the design can be found at the initial design stage. Any mistakes related to tolerance assignment, feature design, part design and other problems can be rapidly solved at the design stage with minimal cost.
EXAMPLE: Analysing the environment effects to an assembly process
This example is derived from a published paper in [1]. In this example, the effects of temperature and pressure variations, from the environment where an assembly process is performed, to the KC of the assembly are presented.
Not only temperature and pressure, other environmental variations, for example, humidity and gravity, can have significant effect on the KC of assemblies depending on the type of the assemblies.
For example, the assembly of products that require micro-metre or sub-micrometre precision, the temperature variation of an assembly environment has a significant effect.
All materials has coefficient of thermal expansion (CTE). That is, all materials will expand when they are at an environment at temperature > 20 degree C.
In the case of 1 micrometre tolerance of the KC of an assembly, if one of the component constituting the assembly is made of aluminium with CTE 22.3 micrometre/metre C and has a length of 10 mm, then when the assembly process is performed at environment with 25 degree C, the expansion length of the aluminum part is 1.12 micrometre (that is already outside the KC 1 micrometre tolerance). In fact, the geometrical variation of this component is not yet taken into account!
An example of gravity effect is in the case of the wing assembly of an aero plane. The effect of gravity to the wing with large length and high mass will cause the wing will deform without any external loads. This deformation will affect the KC of the assembly. Hence, special fixturing is required for the assembly.
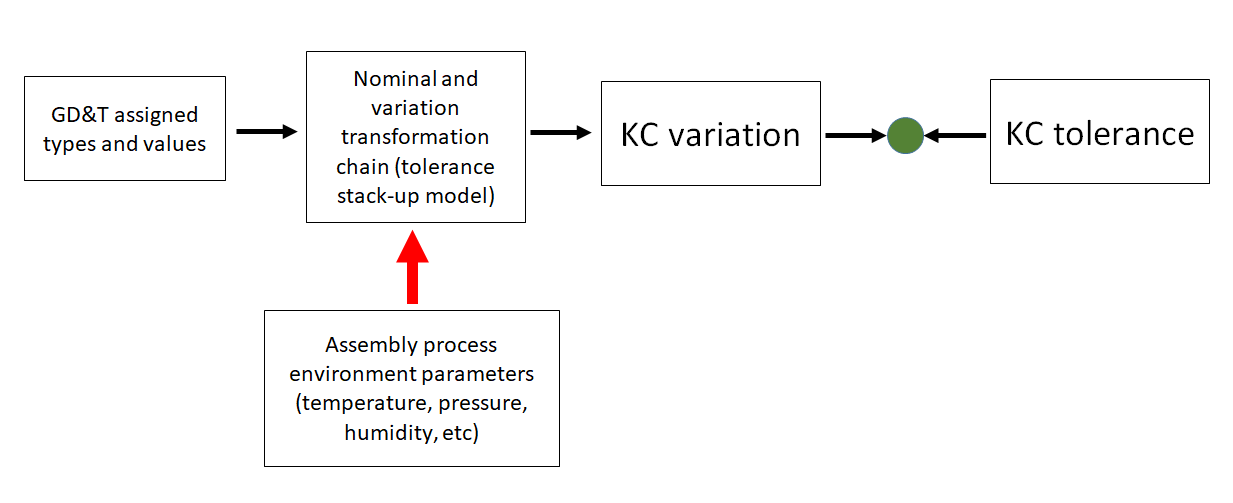
Figure 1 above shows the phase where the effect of environmental-related variations can be evaluated and analysed when the tolerance stack-up model (nominal and variation transformation chain) of the assembly is available.
In figure 1 above, because of the environmental-related effects, the variation of the KC will increase depending how vary the environment where the assembly process is performed.
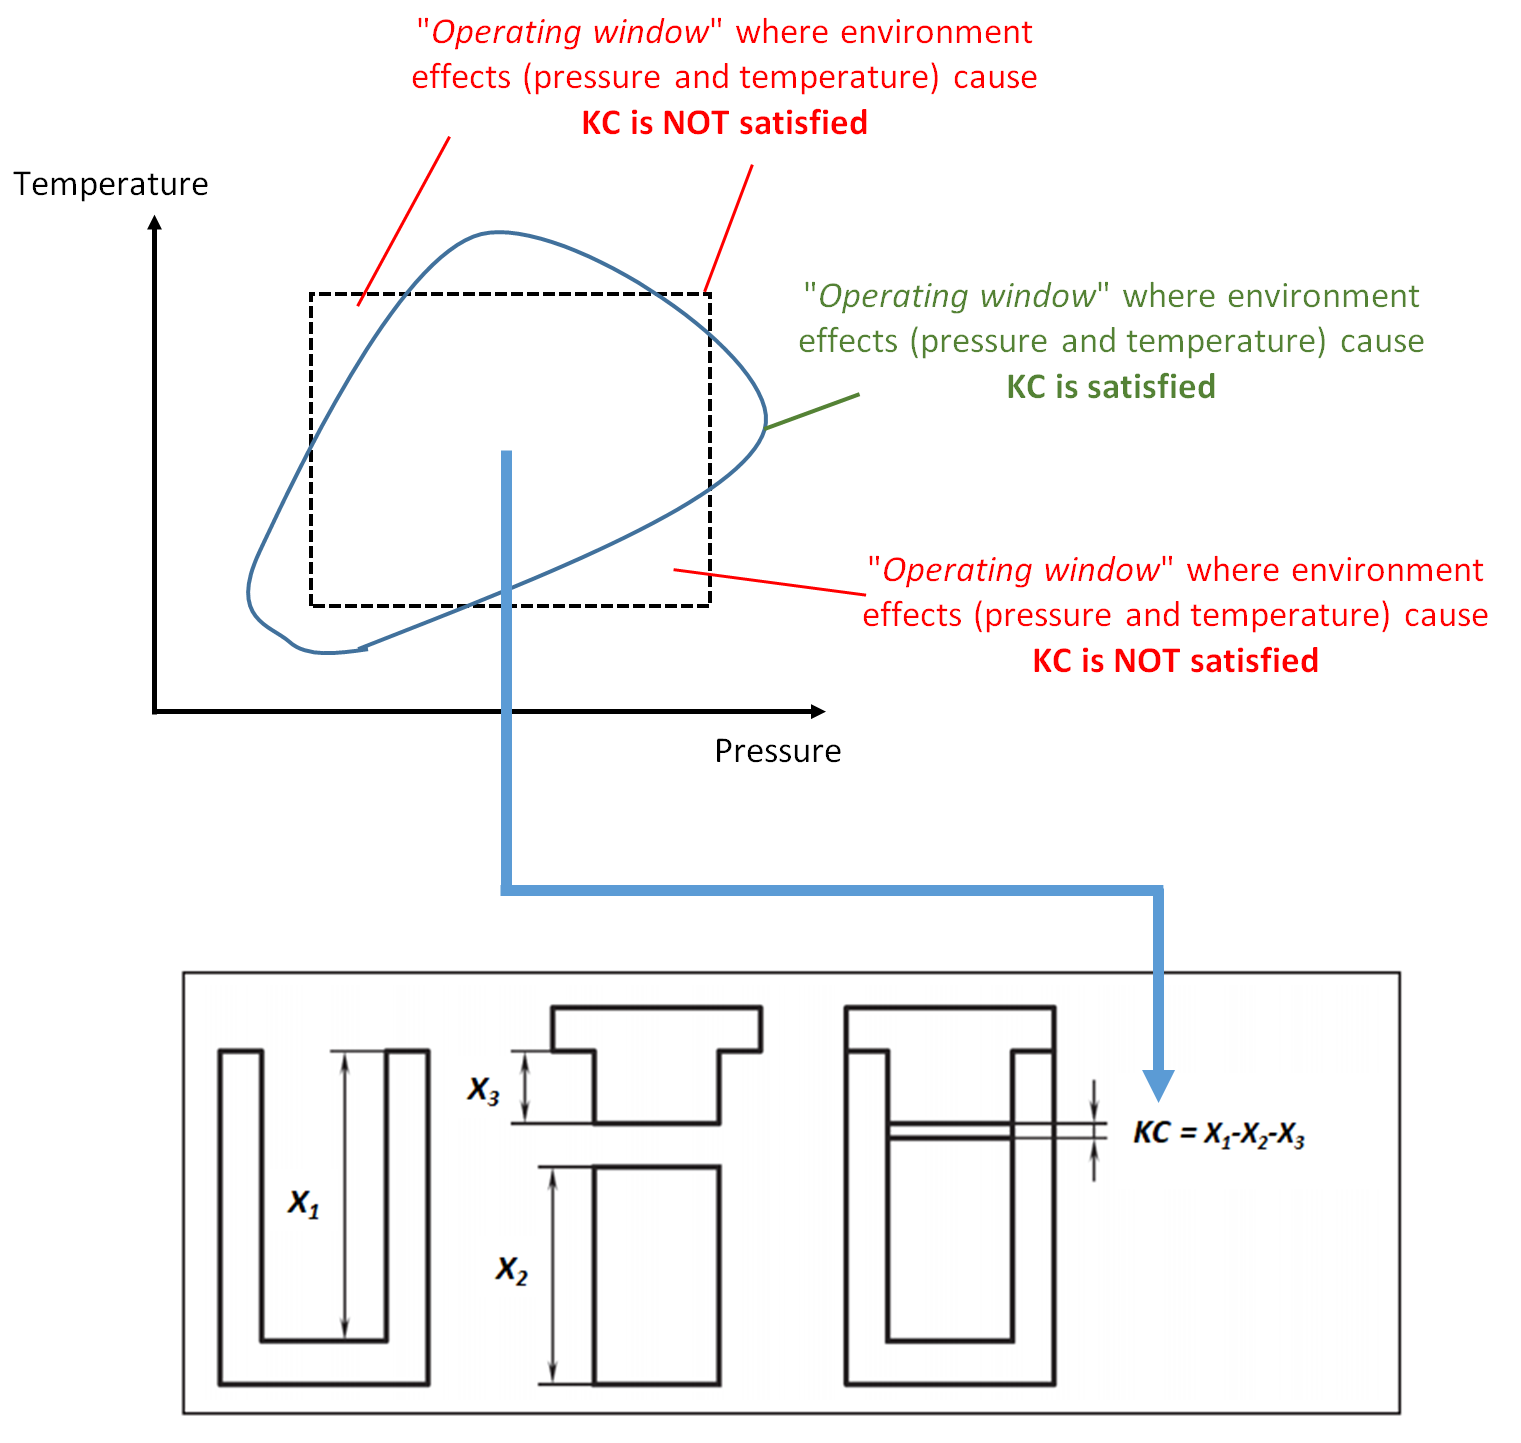
Figure 2 above shows the illustration of the “operating window” of a product assembly. In figure 2, the assembly process is significantly affected by temperature and pressure variations of the room where the assembly process is performed.
Because the assembly process is complex, the combination or joint effect between the temperature and pressure variation is non-linear. So that the feasible operating window (in figure 2) has a non-square shape.
As long as the temperature and pressure variations are still inside the feasible operating window, the KC variation due to these effects will still be inside its tolerance.
However, in practice, the feasible operating window is assumed to be linear and has a square shape (figure 2 with dashed-line). But, in figure 2, there are some area inside the square feasible operation window area that is outside the non-square area. In this situation, the assumed feasible operating window will lead to KC variations that is out-of-tolerance.
Figure 2 (bottom) shows a real simple example of environmental effect that cause variations in the KC of an assembly. In figure 2 (bottom), the example only considers one environmental effect, that is temperature.
For figure 2 (bottom) the product assembly consists of three parts, which are “U”, “T” and “I” shape.
The KC of the assembly is the gap between part “I” and “T” after being assembled with part “U”.
In figure 2 (bottom) the KC is formulated as $X_{1}-X_{2}-X_{3}$. The dimension of the three $X$ variables are significantly affected by the temperature variation, as follow:
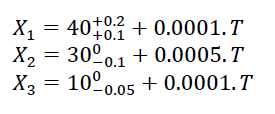
The KC, that is the gap between part “I” and “T” after assembly has tolerance between $0 mm$ to $0.4 mm$.
To have the KC to be within $0mm-0.4mm$, hence the assembly process should be performed at approximately 0 degree C!
The analysis is as follow (when the assembly is done at 0 degree C):

From the calculation above, we can see that the temperature of the room where the assembly process is performed has a significant effect to the KC!
The example in figure 2 (bottom) is only a simple example. However, this example can clearly show how important to consider the environment-related variations when performing an assembly process.
In more complex assembly processes, the feasible operating windows very of then have three or more environment variables that cause the operating window areas become a complex shape.
Conclusion
In this post, general benefits of having the nominal and variation transformation chain (tolerance stack-up model) of an assembly.
Many product assembly analyses can be done at the design stage of the product to find errors and mistakes before the manufacturing process of parts.
By knowing errors and mistakes at the early design stage, corrective action can be easily implemented with minimal cost.
A real example is given to show how environmental-related variations, in this case temperature, can significantly affect an assembly process.
Finally, definition of feasible operating window of an assembly process is also presented and explained.
Reference
[1] Armillotta, A. and Semeraro, Q., 2013. Critical operating conditions for assemblies with parameter-dependent dimensions. Proceedings of the Institution of Mechanical Engineers, Part B: Journal of Engineering Manufacture, 227(5), pp.735-744.
We sell all the source files, EXE file, include and LIB files as well as documentation of ellipse fitting by using C/C++, Qt framework, Eigen and OpenCV libraries in this link.
We sell tutorials (containing PDF files, MATLAB scripts and CAD files) about 3D tolerance stack-up analysis based on statistical method (Monte-Carlo/MC Simulation).
