Geometric dimensioning and tolerancing: How to consider measurement processes when specifying GD&T tolerances
In this post, we will describe things to consider related to measurement processes when we specify GD&T tolerances on a mechanical drawing.
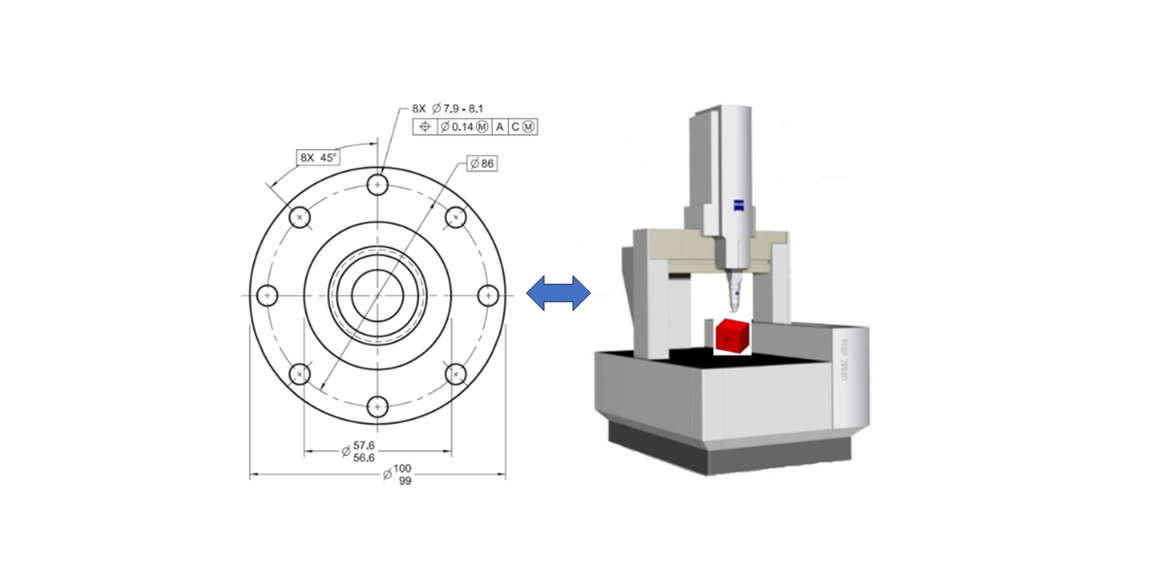
Geometric dimensioning and tolerancing (GD&T) is a “technical language” used by mechanical design engineers to convey their design intents to manufacturing and inspection engineers [1].
In this post, we will describe things to consider related to measurement processes when we specify GD&T tolerances on a mechanical drawing.
The design intent of a designer can be how parts will function or operate (rotation or static), how the parts should be made and how to inspect the parts after manufacturing processes [2].
After reading this article, readers will be able to understand important aspects to consider when specifying GD&T tolerances on part features.
READ MORE: 2D tolerance stack-up analysis with examples
Do you want to have good research philosophies and improve your research management and productivity?
This book is a humble effort to map well-known and proven principles and rules from various disciplines, such as management, organization decision theory, leadership, strategy, finance and marketing, into a single practical research guide that applies to all disciplines.

You can also get this book from Rakuten Kobo.
Why we need GD&T?
GD&T is not a replacement for traditional “+/-” tolerancing. Instead, GD&T complements the traditional “+/-” tolerancing so that no ambiguity on the meaning of tolerances specified in the mechanical drawing of a part.
The de facto or reference standard for GD&T is ASME Y14.5 standard. furthermore, its European-influenced standard counterpart is ISO 1101 (Geometrical product specifications).
In these standards, there are five basic groups of GD&T tolerances, that are form, orientation, location, profile and runout tolerances.
In practice, GD&T is a technical language that enables mechanical design engineers to communicate their design intent (such as how we should measure or process a part) to manufacturing and inspection engineers.
For some examples, with GD&T tolerancing, mechanical design engineers can:
- Convey their intent that their part should be placed in a collet when inspecting their part. This intent can be specified by specifying the main datum A as the main cylindrical feature of their designed part.
- Convey their intent that their part should be processed to high-precision face milling process by specifying a flatness tolerance on the main surface of a part as the main datum A.
- Convey their intent that their part should be measured (probed) on the entire surface on a cylindrical feature by specifying cylindricity tolerance on the feature.
- Convey their intent that the holes in their part should be drilled sequentially using absolute coordinate frame when determining drilling positions by specifying position tolerances on the hole of their part.
And many other examples that describe the usefulness of GD&T tolerances as the complement on top of the traditional “+/-” tolerances.
READ MORE: Understanding fixturing constraints: locator, clamping, support and guide
Things to consider with respect to measurement processes when we specify GD&T
GD&T and measurement processes to verify the tolerances are tightly correlated.
When specifying GD&T tolerances on part features, mechanical design engineers should also consider how their designed parts should be inspected (GD&T verification processes) and whether their inspection equipment can verify their GD&T tolerances.
Things to consider related to measurement process when specifying GD&T tolerances are as follows:
Consider measurement uncertainty when assigning tolerance value
It is well known that any tolerance assignments, either “+/-” or GD&T tolerancing, should consider the measurement uncertainty in our inspection processes.
For measurement process to be economical, the golden rule or ration between our measurement uncertainty (expanded, commonly cover 95% confidence interval with $k=2$) $U$ and a given tolerance value $T$ is $U/T$ < 20%. Otherwise, the cost of type B error (rejecting good parts or accepting bad parts) will significantly large and so increase the total inspection cost [3].
For example of the implementation of the golden rule is that when we assign a flatness tolerance as $0.02mm$ and after some trials, our measurement expanded uncertainty to verify the flatness tolerance is $0.01$. Hence, the $U/T$ ratio is 0.01/0.02=50% > 20%.
That is, we can say that our measurement processes cannot be used to verify the given flatness tolerance.
The solutions, for example, are:
- To improve our measurement capabilities, by for example, using a better measuring instrument or improve the measurement environment to reduce noises.
- To subcontracting the measurement process to another company with better measurement capabilities than ours.
- To relax (increase) the flatness tolerance value to be $0.04mm$ to satisfy the golden rule.
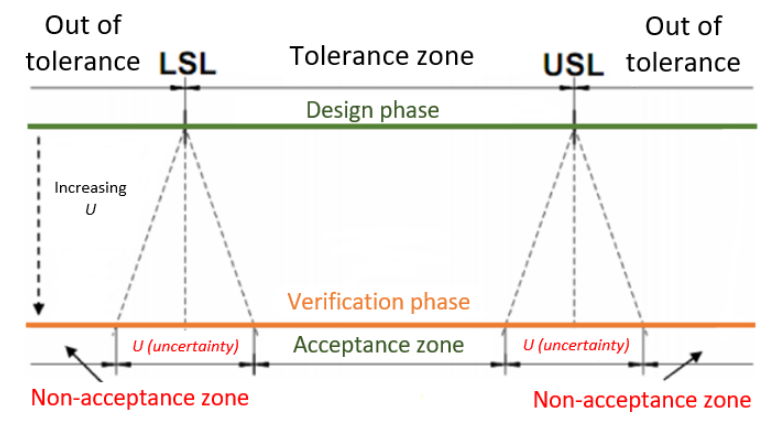
The uncertainty of measurements will reduce the acceptance range (tolerance zone) of any tolerances. For example, when we have a flatness (one-sided) tolerance of $0.02mm$ with expanded measurement uncertainty of $0.01mm$, basically, our tolerance zone is reduced to be $0.02mm-0.01mm=0.01mm!$
To illustrate this tolerance zone reduction due to uncertainty, figure 1 below shows the rule for accepting part in inspection process. We can see from this figure that our measurement uncertainties should be considered when accepting inspected parts.
Our measurement uncertainty will reduce the widths of the tolerance zone and cause accepting parts become stricter than its specified tolerance zone.
Consider measurement time required to verify GD&T tolerances
The time required to perform a measurement positively correlate to the inspection cost of the measurement [3].
That is, when we assign a tolerance type and value on a part feature, we should consider how long the measurement can be to verify the given tolerance.
For example, in a simple flatness measurement, when we have a very large flat surface and we give a very tight flatness tolerance, the measurement process should sample points covering the entire surface to have a high accuracy estimate of the flatness.
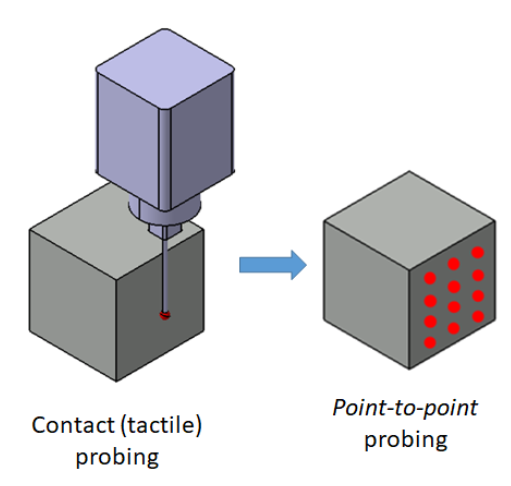
Considering using a tactile coordinate measuring machine (CMM), and using point-to-point probing (illustrated in figure 2 below), the flatness verification process will last very long.
This long-time verification process should be taken into account when specifying the flatness tolerance.
Consider the placement of parts in inspection
The way we specified datums and tolerance types in GD&T will affect how the part will be placed and oriented when we perform verification processes.
The more complex the part placement is, the more fixturing cost we need. Hence, we need to consider this fixturing cost by considering the part placement in inspection.
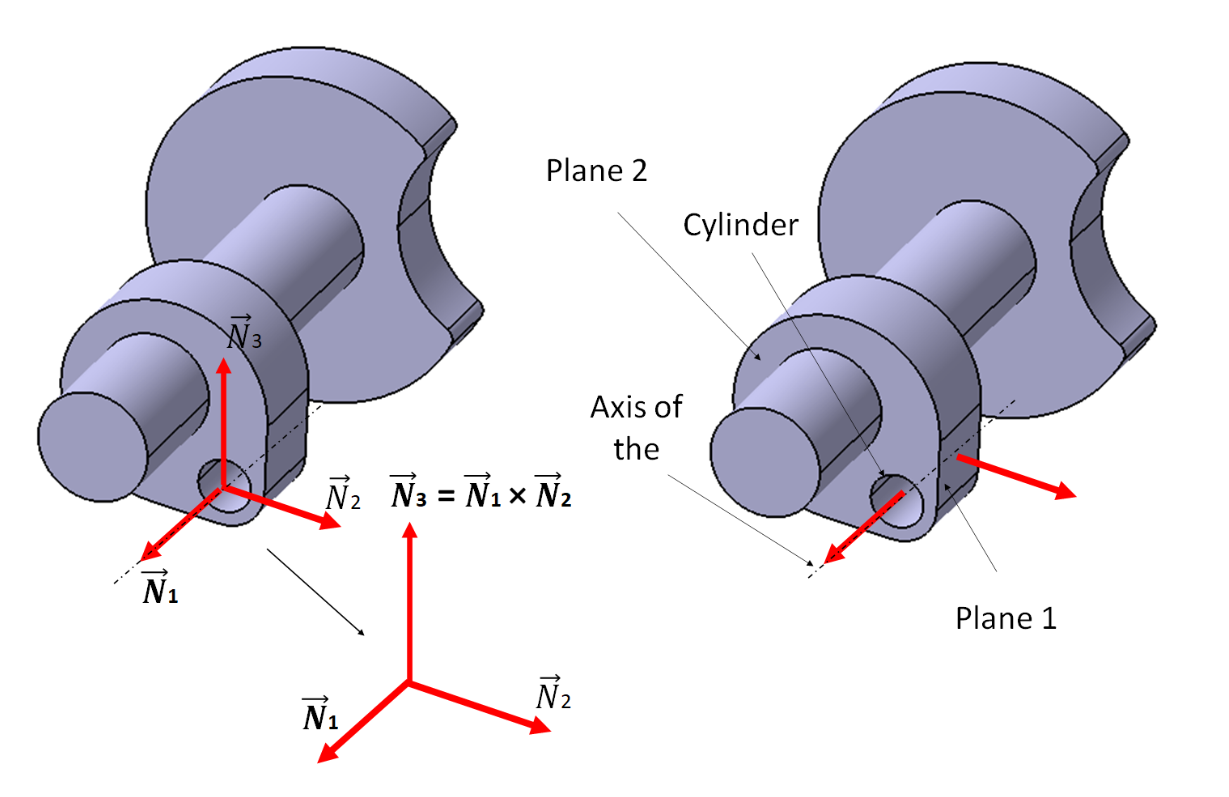
The more complex datum we are using, the more complex the part alignment we need and then the more complex fixturing equipment we need to use.
For example, figure 3 shows a complex part alignment due to complex datum requirement following the specific GD&T tolerances on a non-prismatic part.
Consider what type of instrument used to measure or to verify GD&T tolerances
For GD&T, the algorithm to verify the tolerance is “minimum-zone” fitting [5].
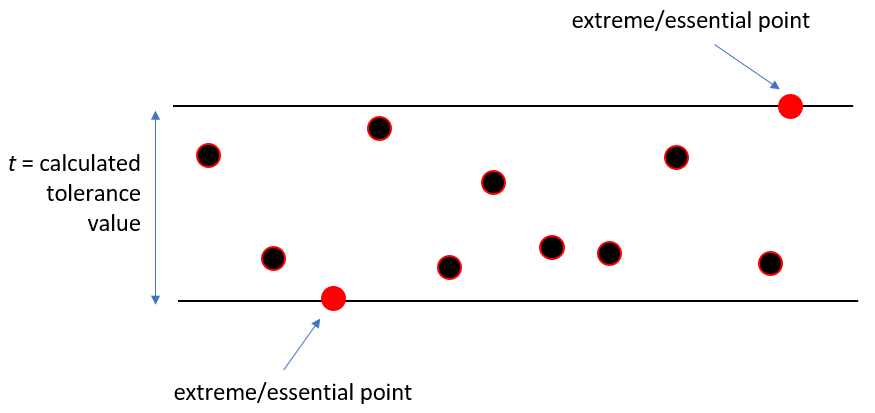
In minimum-zone fitting, the calculate tolerance value is only affected by the extreme points on the sampled points of a surface to measure.
Figure 4 shows the illustration of the minimum-zone fitting that only affected by two points regardless many points that are probed or captured by a measuring instrument.
That is, unlike least-square fitting [2], minimum-zone fitting is very sensitive to outlier. If there is an outlier, the outlier points will be considered as the extreme point and the tolerance calculations will become very large.
Having know the sensitivity of the “minimum-zone” fitting to calculate GD&T tolerance value in verification or inspection processes, we need to carefully consider what measuring instrument we will use to inspect or verify our GD&T tolerances.
There are three main types of measuring instruments for GD&T verification (inspection). They are tactile CMM, dial gauges or optical instrument [4].
The tactile CMM is the reference measuring instrument for GD&T verifications. The probing error of the CMM will directly increase the verified value of GD&T tolerances.
One important thing to note that when we are using tactile CMM, the probing error of scanning measurement will be larger than point-to-point measurements.
For dial gauge, this is a classical way of verifying GD&T. This method can give the least error as long as the operators that perform the measurement are well-trained and have experiences.
The last option is by using optical CMMs, this CMM can probe a large number of points on measured surfaces in relatively short time. However, these instruments usually have some outliers that can cause our tolerance calculation to become invalid (very large).
Low-pass filter should be applied to measured points when verifying GD&T using an optical CMM [4].
Consider the surface texture of parts when inspecting GD&T tolerances
Related to the “minimum-zone” fitting procedure when calculating GD&T tolerance values, surface texture, such as roughness and waviness will affect tolerance value calculations [4].
Because the roughness or waviness will be detected as the extreme or essential points on a measured surface. These points will determine the calculated tolerance values.
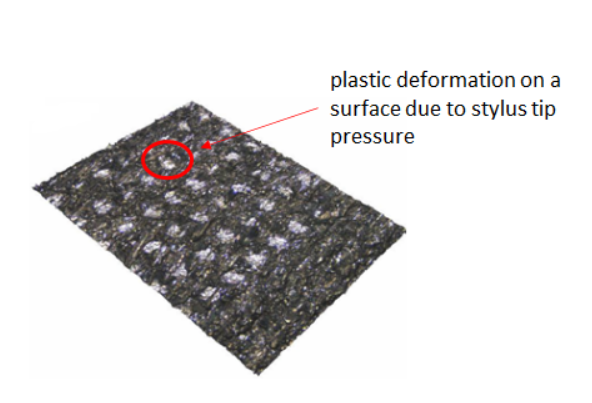
Figure 5 below shows the example of the effect of texture on calculated GD&T tolerances [4].
In this figure, the surface of a measured part has indented textures due to the Hertzian force of the tip of the stylus probe of a tactile CMM.
After being measured by an optical CMM, those texture are captured and cause the evaluated flatness value to become larger than when we measure with tactile CMM [4].
That is, we need to make sure the surface of measured part should be clean from dust and particles as well as rough texture.
Consider the curvature of 2D free-form profiles or 3D free-form surfaces
When we have a complex surface profile, we need to be careful when assigning profile tolerances on the curved surface or profile.
If the profile tolerance is too tight, there will be difficulty in measuring the curved section of the surface or the profile.
Because, we need to probe or sample more points on the curved section than the non-curved section so that we can faithfully reconstructed the geometry of the curved section and get an accurate tolerance values.
In addition to many points probed on the curved section, we need to consider how to access the curved section. The curved section may cause an “undercut” where the stylus of a tactile CMM cannot access the area and hence cannot sampled (probed) the points.
Figure 6 below shows the example of probing points requirement and undercut on the curved section of a profile.
In this figure, we can see that some time our profile tolerances are difficult to verify due to maybe our measuring instrument incapability to access the curved area or the time to measure the curved area will very long (due to the need of sampling highly dense point on the curved section) so that we cannot economically justify the measuring time (and then the measuring cost).

READ MORE: Understanding fundamental assembly features: Mate and contact features
Conclusion
In this post, we have discussed the importance of considering measurement processes when we specify GD&T tolerances on a mechanical drawing.
We know that GD&T tolerances are directly related to and affect both manufacturing and inspection processed of a part where we specify the GD&T tolerances.
By considering the measurement processes (including what types of measuring instrument we have, how long we want the measurement to finish and other aspects), we can effectively and efficiently determine correct GD&T tolerances on our parts to match our facility capabilities and production cost targets.
References
[2] Syam, W.P., 2018. Metrologi manufaktur: Pengukuran geometri dan analisis ketidakpastian.
[3] Moroni, G., Petrò, S. and Tolio, T., 2011. Early cost estimation for tolerance verification. CIRP annals, 60(1), pp.195-198.
[4] Moroni, G., Syam, W.P. and Petrò, S., 2018. A simulation method to estimate task-specific uncertainty in 3D microscopy. Measurement, 122, pp.402-416.
[5] Moroni, G. and Petro, S., 2008. Geometric tolerance evaluation: A discussion on minimum zone fitting algorithms. Precision Engineering, 32(3), pp.232-237.
You may find some interesting items by shopping here.
