Important aspects in micro-scale and Nano-scale measurements
Measuring dimension and geometry at micro-scale and Nano-scale is challenging. Because, at micro- and Nano-scale, there are additional effects that are not relevant at higher-scale measurements (than micro-scale measurement), but are very relevant at the micro- and Nano-scale.

Measuring dimension and geometry at micro-scale and Nano-scale is challenging. Because, at micro- and Nano-scale, there are additional effects that are not relevant at higher-scale measurements (than micro-scale measurement), but are very relevant at the micro- and Nano-scale.
In general, dimensional and geometrical measurements (or any other measurements) require very-high resolution and precise measuring instruments. In addition, special procedures need to be followed to obtain good and valid measurement results.
Because, at macro- and Nano-scale, the measurements are very sensitive with regards to environmental variations at very small levels.
In this blog, we will discuss and present the most important aspects to consider when performing measurements at micro- to Nano-scale.
Important aspects that need to be considered for dimensional and geometrical measurements at micro- to Nano-scale
The important aspects that need to be considered are:
The ratio between the tolerance of a measurand and its measurement uncertainty
The measurement of a feature will be considered as efficient or economically feasible if and only if the measurement uncertainty is not more than one-fifth of its tolerance value.
In another word, a measurement in general can be said to be efficient if the ratio between their measurement uncertainty and tolerance is < 20%.
Hence, at micro- and Nano-scale, tolerance values will be very small such that they require a much smaller measurement uncertainty (only 20% of the already very small tolerance values) so that the ratio between the uncertainty and the tolerance is < 20% is satisfied.
This small uncertainty implies that measuring instruments used to verify the dimension or geometry should have a very high precision and accuracy. Hence, the cost of the instruments will be very expensive as well.
The size effect
Components at micro- and Nano-scale have a special properties that are not exist when the same components with the same materials are at macro-scale.
For example, a gravitational force become less significant for components at micro- and Nano-scale. This low gravity effect causes some difficulties, for example, handling the part and will require different types of gripper that the one used for the components at macro-scale.
Another example when we use a stylus tip with very small diameter, let say 120 micrometre of diameter, this stylus will stick to a measured surface due to surface tension. Also, the small stylus tip will cause a very high surface pressure and cause denting on the surface.
Part handling
Handling part at micro- and Nano-scale are difficult and the handling system very often is automated. The need of automated handling system is due to the fact that micro- and Nano-scale part are very difficult to hold and very sensitive.
Measurement method
Tactile or contact measurement methods for micro- and Nano-scale parts will reach a limit such that the use of the tactile instruments is not efficient or even not possible at all.
For example, a stylus tip at micro-scale diameter will be very easy to be broken and tends to stick to a measured surface. Another example for tactile instrument is an accessibility limitation to access the features at micro- and Nano-scale on a component.
Hence, the current trend is to use optical (non-contact) instruments for dimensional and geometrical measurements at micro- and Nano-scale. For example, using coherence scanning interferometry, confocal microscope, point autofocus or focus variation microscopy.
Measurement procedure
Different measurement tasks will require different procedures. For example, alignment procedures to define a reference coordinate system is only applied for tactile instrument, for example coordinate measuring machine (CMM).
Also, surface topography measurement with 90 degree slope on surface features are still difficult for non-contact measurement (but very easy with a tactile CMM with a contact stylus system with some limitation on feature accessibility as well).
Feature accessibility on a component
An obvious example of feature accessibility problem for tactile or contact measuring instrument is where a CMM with 120 micrometre stylus tip diameter is used to measure a micro-hole with 100 micrometre diameter. Obviously, the stylus tip cannot go into the hole and cannot measure the hole’s depth and diameter.
High-aspect ratio (for depth)
High-aspect ratio feature is a feature that has a depth dimension very much larger that its width dimension. Measurements (and also fabrication) of high-aspect ratio features are difficult for both contact and non-contact measuring instruments. This measurement challenges are still valid until now.
For contact measurements, high-aspect measurement difficulties are mostly related to accessibility problems. Meanwhile, for non-contact or optical measuring instruments, high-aspect measurement difficulties are mostly related to light reflections. This light reflections returning to the sensor of the optical instruments have very low power so that the sensor has difficulty to detect the returning light and perform measurement calculations.
Environmental effects
For measurement at micro- and Nano-scale, small environmental variations will significantly affect measurement results and their uncertainty.
For example, dusts that are used to be insignificant for macro-scale measurement becomes very significant for micro- and Nano-metre measurements. Because, the size of the dust is similar or even larger that the size of micro-stylus tip or micro-features on a component to measure.
Another example is the effect of temperature variations. A small temperature increase will cause a component to expand and becomes larger and change its dimension at micro-metre scale. The same for small vibration, vibration noise will dominate the error of micro-to Nano-scale height and flatness measurements [1].
Physical phenomena that only applied for Nano-scale measurements
Especially for Nano-scale measurement, there are physical phenomena that only happen at this measurement scale, but do not apply for micro-or higher scale measurements.
These special phenomena significantly affect the uncertainty of Nano-scale measurements. Some examples of those special phenomena found at Nano-scale are:
- Most metals will lose their magnetic properties at Nano-metre scale
- Gold does not shine and does not have neutral property at 1 nm scale
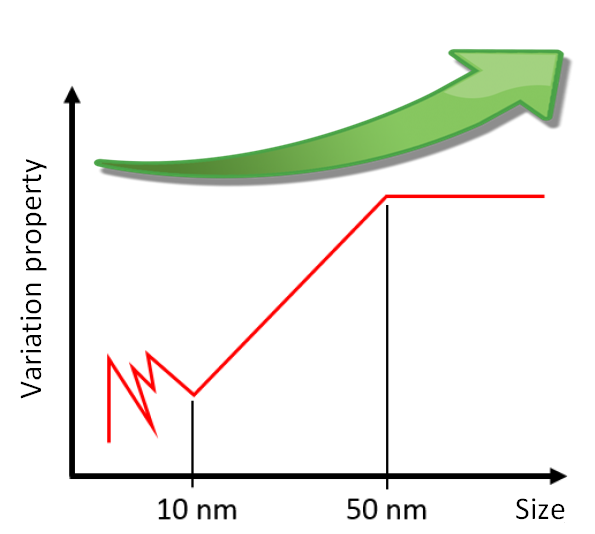
- Particles with size of less than 50 nm will have different property and behavior if the same particle at micro- or macro-scale

In figure 1 above, the property of particles at difference size-scale is presented. In figure 1, a particle will always in motion (vibrate) when the particle is at < 10 nm size and the particle will be stable at > 50 nm size.
In figure 1, we can observe that particles with size > 50 nm will show a Stabil condition.

In table 1 above, various types of Nano materials are shown. In table 1, we can see various types of Nano materials, such as crystals, films, wires, tubes and surfaces.
Recently, due to the advance of manufacturing processes and optical surface topography measuring instruments, surface geometry can be designed and deterministically fabricated or manufactured to provide special functionalities, such as to improve lubrication and homophobic property to repel water from surfaces.
Hence, the measurement of Nano-scale surface features is becoming more and more important.
The main challenge of Nano-scale measurement with optical instruments is on how to establish the measurement traceability.
Common measuring instruments used for Nano-scale measurement
There are various measuring instruments used for Nano-scale measurement. These instruments are already common and well known to be used in both research and industry.
These common instruments are:
- Scanning electron microscope (SEM)
- Atomic force microscope (AFM)
- Transmission electron microscope (TEM)
- X-ray diffraction system (XRD)
- Other optical scanning method, such as coherence scanning interferometry (CSI) and confocal microscope (CM)

In table 2 above, several common types of Nano-scale measurements are presented. In addition, common instruments used for each measurement types are also explained.
For 3D surface texture measurement, AFM is very common to use and its traceability has been known or established. However, this instrument is very slow, only cover a very small area and usually difficult to use.
Recently, optical measuring instruments for 3D surface topography measurements are used. These instruments are coherence scanning interferometry (CSI) and confocal microscope (CM). however, their traceability are still in development and toward maturity.
Conclusion
In this post, important aspects that need to be considered when performing dimensional and geometrical measurements at micro- and Nano-scale are presented.
Many factors, that are insignificant or even negligible for measurements at macro- or meso-scale (mm-scale) becomes very significant for measurement at micro- to Nano-scale.
These addition of affecting factors will directly affect the selection of measuring instruments and procedures used for dimensional and geometrical measurements at micro- and Nanometre level.
Reference
[1] Santoso, T., Syam, W.P., Darukumalli, S., Cai, Y., Helmli, F., Luo, X. and Leach, R., 2020. On-machine focus variation measurement for micro-scale hybrid surface texture machining. The International Journal of Advanced Manufacturing Technology, 109(9), pp.2353-2364.
You may find some interesting items by shopping here.
