Manufacturing and space: How GD&T tolerancing is instrumental for rocket and satellite launcher
Sending satellites to space requires a launcher that can defy the gravity of earth and put the satellites into their orbits in space outside the earth’s gravity region. This post briefly presents the application of GD&T (from manufacturing discipline) to space applications.
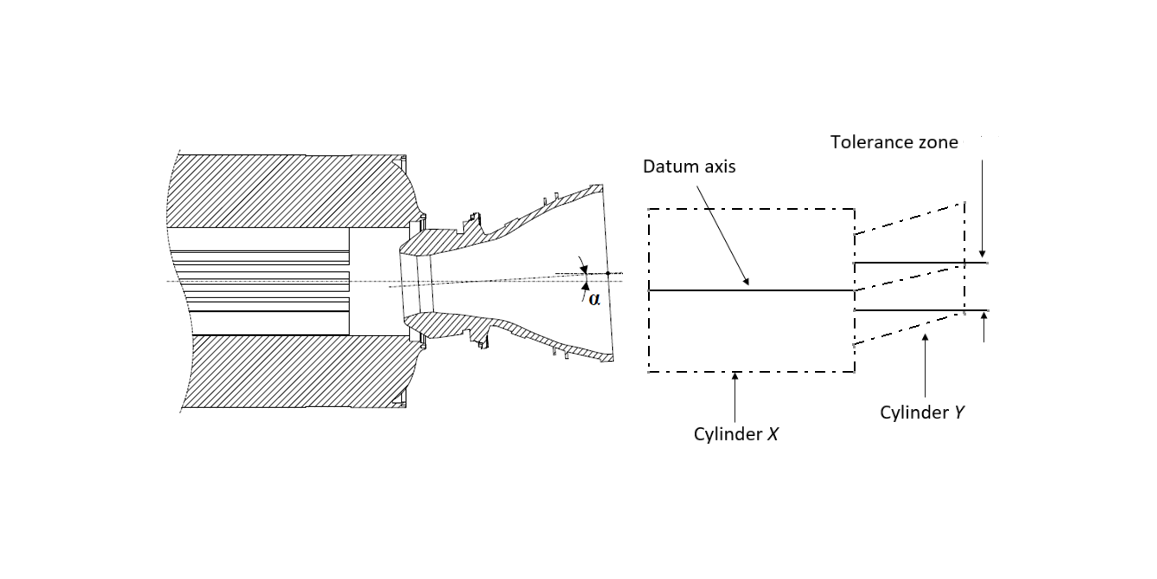
Sending satellites to space requires a launcher that can defy the gravity of earth and put the satellites into their orbits in space outside the earth’s gravity region.
To defy the earth’s gravity, a launcher needs rocket engines as propulsion system.
This post briefly presents the application of GD&T (from manufacturing discipline) to space applications.
The aim is to show the importance of GD&T application in space manufacturing sector with relatively simple and straightforward explanations.
Specifically, this post describes, in a simple way, how GD&T knowledge can give tremendous benefits on the manufacturing of a rocket engine, specifically in their O-ring assembly.
Disclaimer: We do not take any responsibility, in any manners whatsoever, for the information presented herein or any products resulting therefrom.
Rocket engines require complex manufacturing process
Rocket engine is the main propulsion system. A launcher uses rocket engines to produce a tremendous lifting power to carry loads.
A launcher accounts for the significant part of total satellite launch costs.
For examples, the launch cost of Ariane 6 is approximately 100 million euro. Meanwhile, the launch cost of SpaceX falcon-9 is about 70 million euro.
Many launch missions fail due to the failure of the rocket engine of their first or secondary stage of the rocket engine [6].
There are two main types of rocket engines: liquid and solid rocket engines. Whereby, the latter is the latest technology used for rocket engine.
Whatever the type of a rocket engine is, the assembly of any rocket engine is complex [1].
We can take a look at the assembly of Ariane 6 rocket (the latest European rocket to send payloads to space).
Like any other rockets, Arine 6 rocket is constructed from many complex components. Different manufacturing facilities at different countries provide facilities for the assembly of Ariane 6 rocket from the first component to the whole rocket components.
Each manufacturing facility is responsible to assembly a specific sub-system of Ariane 6 rocket based on the expertise and specialisation of the facility.
For example, the assembly of the upper stage rocket is built in Bremen, Germany. The core stage of Arine 6 rocket is built and assembled in Les Mureaux, near Paris in France. The assembly of the Vinci engine powering the upper stage of Ariane 6 rocket, is built and assembled in Vernon, France. This Vinci engine consists of many different parts that come from Ottobrunn, Germany.
These different assembly processes at difference facilities add complexity to the building of Ariane 6 rocket.
READ MORE: 2D tolerance stack-up analysis with examples
O-ring assembly in a rocket engine
Rocket engines produce a propulsion force which provides thrust to lift payloads against gravity to space.
The construction of a rocket engine consists of a combustion chamber, including the injector system, and nozzle. The combustion chamber and the nozzle are assembled by a plugged-in structure and sealed by an O-ring gasket [2].
This plugged-in structure is critical such that when the assembling docking is carried out to connect the combustion chamber and the nozzle, the docking of the nozzle to the chamber should have minimum deviation such that the pressure on the O-ring is homogenous and at expected compression force values
The O-ring deformation should be correct to provide an expected sealing functionality between the combustion chamber and the nozzle.
In addition, minimal assembly error is instrumental to minimise residual stresses on the overall combustion chamber and avoid “thin-walled” structure deformation of the combustion chamber structure.
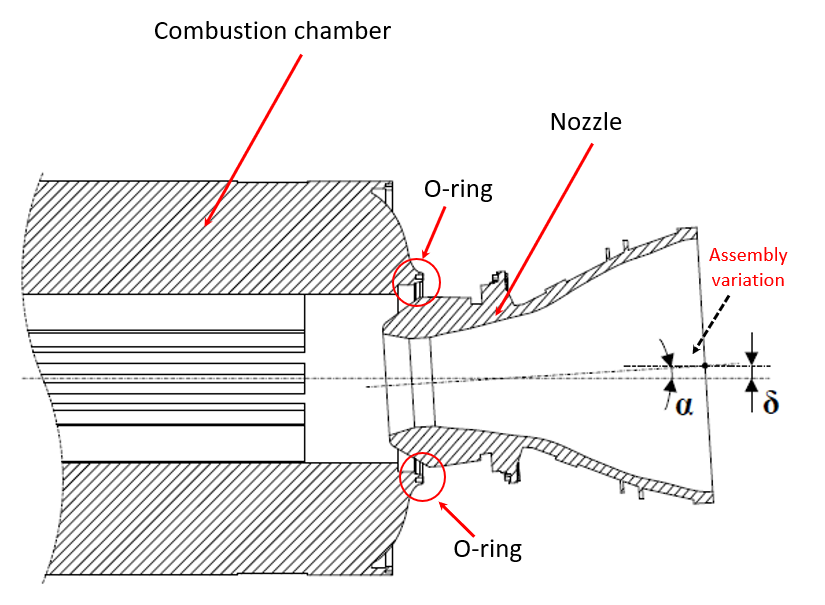
Figure 1 above shows an example of assembled combustion chamber and nozzle of a rocket engine. In this figure, any variations of the nozzle assembly will cause inhomogeneous pressure and unknown deformation on the O-ring (adapted from [2]).
Unknown deformations of the O-ring will cause unknown assembly qualities of the nozzle to the combustion chamber and then unknown failure risks to the rocket engine.
In addition, assembly variations will also cause variations in residual stresses on the combustion chamber wall.
It is critical to verify the quality of the combustion chamber and nozzle assembly, and the O-ring deformation of a rocket engineer.
READ MORE: 3D tolerance stack-up analysis with examples
GD&T role in O-ring assembly
Although mainly the components affecting the O-ring assembly of a rocket engine are a combustion chamber and nozzle, it is actually difficult to make the assembly right.
The tolerances for the combustion chamber and nozzle are very tight and assigned to parts with large sizes [3]. In this case, a small geometrical variation on a feature of the parts can lead to a large tolerance stack-up variations on final assembly features.
There are many factors affecting the final assembly results, such as the cylindricity of the combustion chamber, the flatness of the flange surfaces for bolts joining the chamber and the nozzle, variations of the holes for the bolt to join the flange surfaces of the chamber and the nozzle and others.
The materials used for the combustion chamber and nozzle are special materials. These materials are unique, can stand high temperature and require unique manufacturing processes and complex tooling [3].
Moreover, the materials have thin-walled structures such that any residual stresses can cause bending on the parts and hence increase geometrical variations or errors.
A slight variation in one of these factors will be propagated and amplified to the final assembly variation of the rocket engine.
This variation will significantly affect the residual stress on the rocket engine structure [3] as well as the O-ring pressure or other types of seal, such as flexseals [4]. The seal, either O-ring or flexseaals are usually made of a type of vulcanised rubber [4].
One of the main assembly key characteristics (KC) in rocket engine assembly is the concentricity between the combustion chamber and nozzle after assembly and the shifting (position error) between the combustion chamber and the nozzle.
Figure 2 below shows the concentricity of the combustion chamber and nozzle and the illustration of a concentricity variation. In this figure, when there is a slight concentricity variation of the nozzle’s axis with respect to the combustion chamber, there will be a significant higher pressure on the O-ring at one side than the other opposite side.
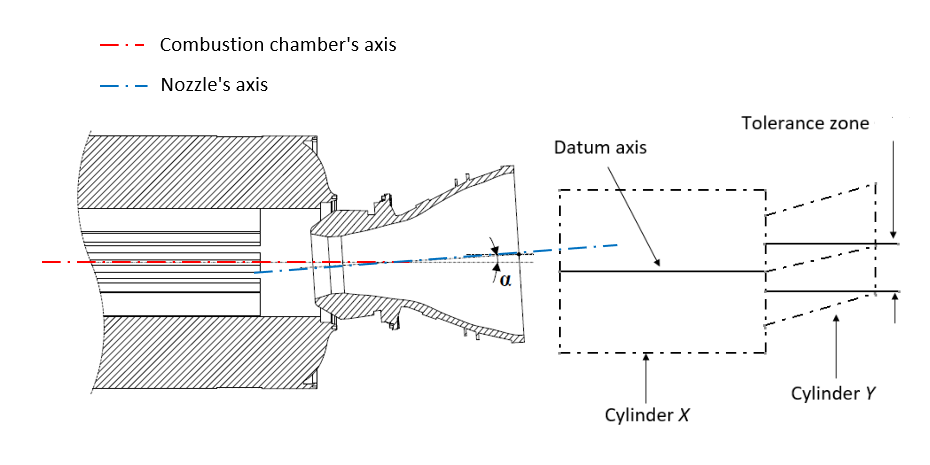
From figure 2, the assembly of the rocket engine is briefly as follows [2]. The combustion engine is fixed at a position. Then, the nozzle is inserted into the combustion chamber via a parallel fixture platform. During the assembly, the platform assures no rolling variations on the nozzle. Hence, only yaw and pitch error concentricity variations are relevant.
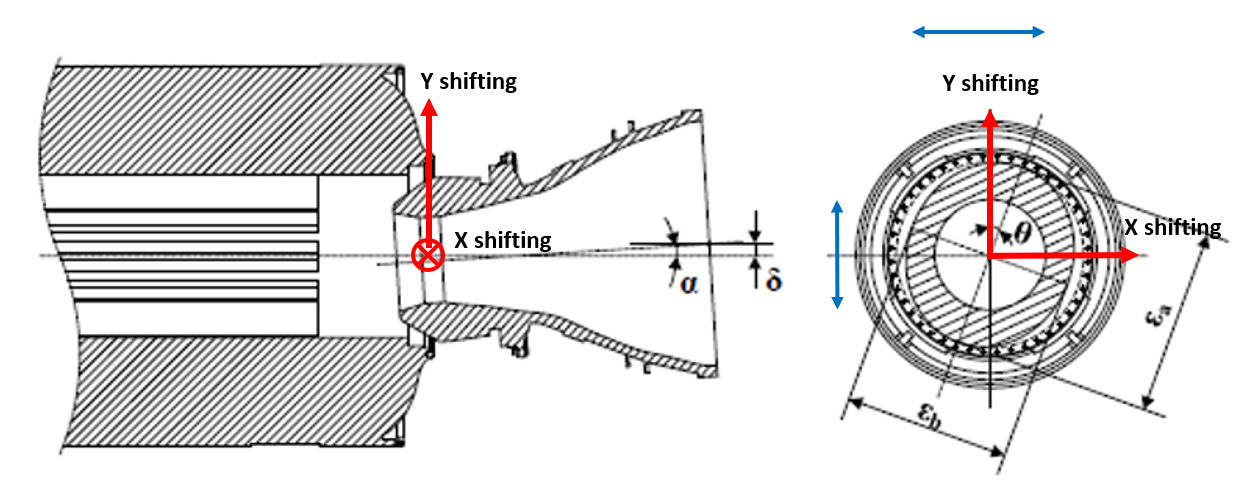
In addition, there is also shifting variations (positional errors) when the nozzle is attached to the combustion chamber via the flanges surfaces that are bolted together. Figure 3 shows the possible shifting (position error between the combustion chamber and the nozzle).
In figure 3, the shifting errors can be caused by assembly shifting errors or the hole position errors for the bolts and nuts of the flanges.
For the rocket engine assembly, factors affecting the final concentricity and shifting (position error) between the combustion chamber and nozzle are:
- The cylindricity and concentricity for the combustion chamber and nozzle.
Deformations caused by manufacturing error and the deformation of “thin-walled” structure of the chamber [5] and the nozzle cause cylindricity and concentricity errors for both the chamber and nozzle. These geometrical errors contribute to the concentricity error of the rocket engine assembly.
- Flames of the flange surfaces.
In the assembly process, after the insertion, the nozzle will be joined with the combustion chamber by series of bolts and nuts on the flanges. These bolts are tightened at a predetermined force to keep the nozzle attached to the chamber in extreme vibration and heat conditions.
During manufacturing, the flatness of the flange will be not perfect. Hence, when the bolt is tightened, the tightening forces will not be the same at every bolt and may cause some tilting of the nozzle with respect to the chamber due to the flatness errors of the flange surfaces.
Figure 4 below shows the illustration of the flatness error.
- Positional accuracy of the hole on the flange.
In addition to the flatness error of the flanges, the hole position errors on the flange where the bolts will be inserted to join the nozzle and the chamber will cause the shifting (position errors) of the nozzle assembly to the chamber.
The above geometrical error sources may not be the only one affecting the assembly error. There will be other factors that may not be mentioned or consider in this example. Some possible additional geometrical errors are spring-back effect of non-rigid (thin-walled) structures [5].
The illustration of positional error is shown in figure 4 below.
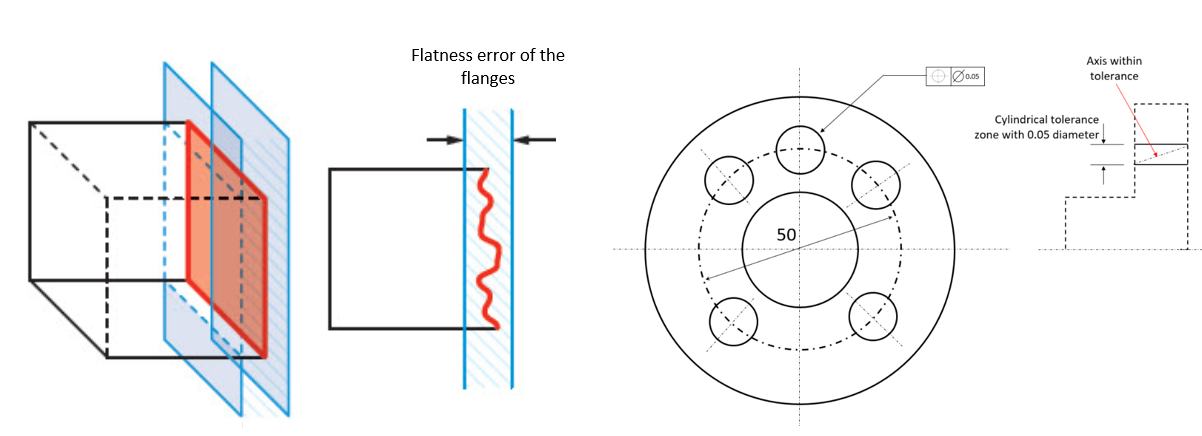
Those mentioned geometrical errors will propagate through part features to the assembly key characteristics (concentricity and shifting errors) and cause the assembly errors that increase pressure at some section of the O-ring and increase residual stresses on the assembly structure.
This additional significant pressure to the one of the O-ring will affect the sealing capability of the O-ring as well as the O-ring’s life time.
It is very challenging to verify the assembly quality (pressure homogeneity) of an O-ring assembly. Because, after the assembly, the O-ring will be hidden so that it is difficult to assess its property after the assembly.
Here, the analysis of tolerance stack-up analysis can be used to evaluate the possible variations of the assembly even before the parts are made. This stack-up evaluation can be in the form 3D and 2D analysis.
READ MORE: Understanding fundamental assembly features: Mate and contact features
Conclusion
This post explains the knowledge and expertise of GD&T (as part of manufacturing discipline) are instrumental for space applications.
The example of GD&T applications for the evaluation of a rocket engine’s O-ring assembly has been presented. The assembly of O-ring in a rocket engine (both solid and liquid) is vital since the O-ring functions to seal the combustion chamber of the engine’s propulsion. Any leaks on the O-ring will cause a fire and explosion of the rocket engine.
GD&T enables the evaluation of rocket assembly to understand the assembly variation from 2D drawings and before any manufacturing and assembly processes are carried out.
References
[1] https://www.ariane.group/en/news_kid/how-do-you-build-ariane-6-rockets/. Access: 22 August 2024.
[2] Zhang, J., Wang, Y., Wang, J., Cao, R. and Xu, Z., 2023. Online O-Ring Stress Prediction and Bolt Tightening Sequence Optimization Method for Solid Rocket Motor Assembly. Machines, 11(3), p.387.
[3] Gradl, P.R. and Protz, C.S., 2020. Technology advancements for channel wall nozzle manufacturing in liquid rocket engines. Acta Astronautica, 174, pp.148-158.
[4] Chapman, J. and Nix, M., 1992, March. Overview of the manufacturing sequence of the Advanced Solid Rocket Motor. In Space Programs and Technologies Conference (p. 1275).
[5] Toyoda, D., Wärmefjord, K. and Söderberg, R., 2023. Challenges in geometry assurance for composites manufacturing. Journal of Computing and Information Science in Engineering, 23(5), p.051007.
[6] https://www.popularmechanics.com/space/rockets/g18751736/rocket-launch-failures/. (accessed: 10 September 2024).
You may find some interesting items by shopping here.
