Measurement system analysis: Gauge repeatability and reproducibility (Gauge R&R) test
This post will give a practical explanation about gauge repeatability and reproducibility (Gauge R&R or GR&R) test. Gauge R&R is one of measurement system analysis methods.

This post will give a practical explanation about gauge repeatability and reproducibility (Gauge R&R or GR&R) test. Gauge R&R is one of measurement system analysis methods.
Gauge R&R test is one of the most common methods used to verify whether a measuring instrument we use to measure parts is capable or not capable to measure the parts.
In this post, two real examples of Gauge R&R applications is presented and explained. The application is the analysis of the capability of a Vernier calliper to measure cylinder diameters.
The explanation is presented by presenting and discussion Gauge R&R summary results. By this presentation, the explanation is very practical and applicable
Gauge R&R is very famous in industries, from manufacturing, food to oil & gas industries.
Hence, it is important to understand Gauge R&R summary reports. In this post, the Gauge R&R analysis examples use Minitab software to statistically process measurement data and present the results of Gauge R&R tests.
Gauge R&R test: A brief introduction
Measuring systems considered to be analysed by Gauge R&R test include measuring instruments used to measure parts (either contact or non-contact instruments), operators that use the measuring instruments and the procedures used by the operators to use the measuring instruments.
The fundamental idea is that to be able to measure parts or components, the variation on measurement results that originate from an instrument used for the measurement should be much smaller than the variations originated from measured the parts or components.
Hence, there are at least three factors included in Gauge R&R test. Because of these factors, gauge R&R is a comprehensive method to analyse and verify the capability of a measuring system including factors that directly involved in the measuring system operation.
Commonly, measurement analyses only perform repeatability and reproducibility test.
Repeatability is the variation of repeated measurement results taken from the same instrument, operator, part and time.
Reproducibility is the variation of repeated measurement results from at least different instrument or operator or time.
However, these two repeatability and reproducibility tests are not enough. The operator and measurement procedure should be analysed as well.
Gauge R&R also includes these repeatability and reproducibility tests.
Gauge R&R is very common for semi-conductor manufacturing. Even, in semiconductor industries, Gauge R&R must be performed first before applying a new process, either production or measurement processes.
If there is a slight modification on the procedure of manufacturing or measurement, the modification can cause a previous measurement process that is ok becomes not ok.
Hence, Gauge R&R test is very important to know and understand.
The fundamental concept of Gauge R&R
There are two fundamental concepts that must be understood to perform a Gauge R&R test. They are:
1. Gauge R&R evaluates a measuring system that includes the instrument itself, the operator using it and the procedure used to use the instrument) and it does not evaluate a product or component.
2. Gauge R&R gives information about the total variation related to all factors involved in a measurement system that is under analysis and originated from the instrument and the operator.
The main goals of Gauge R&R analysis
The goals of Gauge R&R analysis are as follows:
- To quantify the variation on measurement results that comes from an instrument in used
- To isolate sources that cause variations on the measurement results of the instrument
- To determine whether an instrument (including the operator and the procedure) is capable to perform a measurement task at hand.
Five requirements to perform a Gauge R&R test
There are five requirements to perform a Gauge R&R test on a measuring system. Those five factors are:
- Five to ten parts (at least) that are intentionally manufactured with varying dimension covering the lower specification limit to upper specification limit of its tolerance. The goal is to evaluate if a measuring system (the instrument, operator and measurement procedure) can “read” or detect the variation of the measured components. Because, the essence that a measuring system is effective to measure parts if the measuring system can read the variation from the parts and not the variations that are not originated from the measuring system, such as the system limited resolution and operator mistakes.
- Two or more operators that perform the measurement of the parts with the measuring system under analysis. The goal is to also analyse the variation originated from the operator.
- A measuring system to be analysed.
- Three or more measurement repetitions for each part and each operator.
- Gauge R&R procedure and statistical analysis (mostly performed by using a statistical software).
Variation sources in Gauge R&R test
Table 1 shows the main source of variations to be analysed under Gauge R&R test.
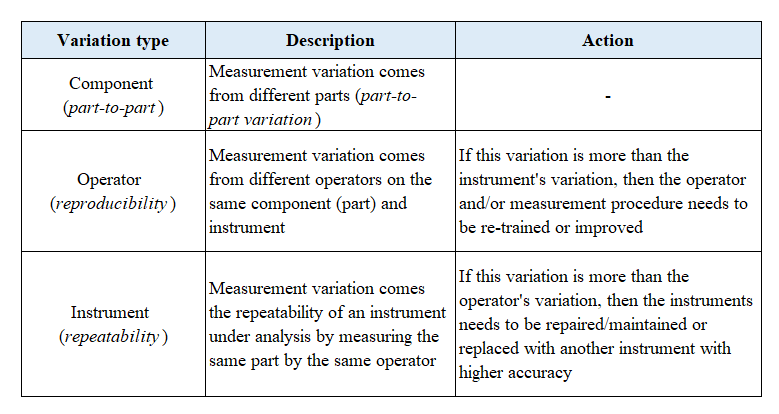
The explanations of the variations in table 1 are as follows. When the variations from an instrument and operator (the total Gauge R&R value) compared to the total variance of the analysis are:
- < 10 %: an instrument under analysis can be used for measurement tasks at hand. Because, from the measurement data, most of variations are form the parts. Hence, the instrument can capture the part dimension variations.
- < 20 %: an instrument under analysis still can be enough to be used for measurement tasks at hand. But, the measurement efficiency will reduce.
- > 20 %: an instrument under analysis cannot be used for measurement tasks under analysis. In general, this situation shows that the instrument needs to be repaired or replaced by another instrument that has higher accuracy than the instrument under analysis. Or, the operator and procedure to conduct the measurements need to be improved.
The brief summary of the mathematical models of Gauge R&R analysis
Now, we will look at the mathematical model on how the gauge R&R analysis is calculated.
However, nowadays, many statistical software will perform the calculations for us and our job is to interpret the results (will be explained in the next section).
(Reader can skip this section to the example sections without missing the essence of this post)
Although gauge R&R analysis is currently mostly calculated by statistical software, it will be very good if we have some understanding on the mathematical model. If you want to go deeper into this mathematical model, please read this book.
By having this mathematical model understanding, we can interpreted and appreciate gauge R&R analysis.
Gauge R&R test is based on analysis of variance (ANOVA) method. Specifically, the most common type of ANOVA used for Gauge R&R is balanced two-factor crossed random model.
The general model of a measurement is:

Where $Y$ is a measured value of a component taken randomly from a manufacturing batch. $X$ is the true value of the component and $E$ is an error from the measurement.
Where $X$ and $E$ are:

Where $p$ is for process and $m$ is for measurement system.
Hence, $Y$ will be:

Where covariant $\gamma _{p}$ is defined as:

From the equation above, if a measuring system used has a very low variation (reliable), hence $\gamma _{m}$ will reduce and the correlation between a measured value $Y$ and the true value $X$ is close to 1. Detailed description of the symbols from eq. 1 to eq. 4 is as below:

Note that from the table above, the manufacturing process variations include variations from operators and manufacturing and/or measurement procedures.
The model of balanced two-factor crossed random is as follow:

Where $i=1,2,…,p; j=1,2,…,o; k=1,2,…,r$. $P_{i}, O_{j}, (PO)_{ij}, E_{ijk}$ are random variables that follow normal distribution with average value of $0$ and variance $\sigma _{P}^2, \sigma _{O}^2, \sigma _{PO}^2, \sigma _{E}^2$, respectively.
The data structure for Gauge R&R experiment of this model is presented as below:
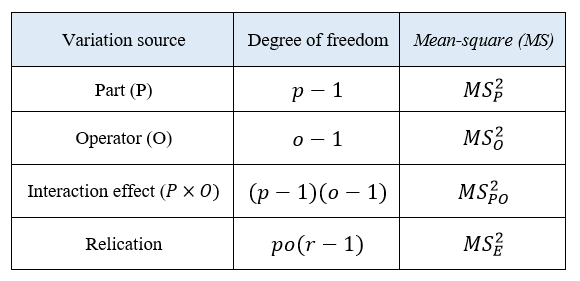
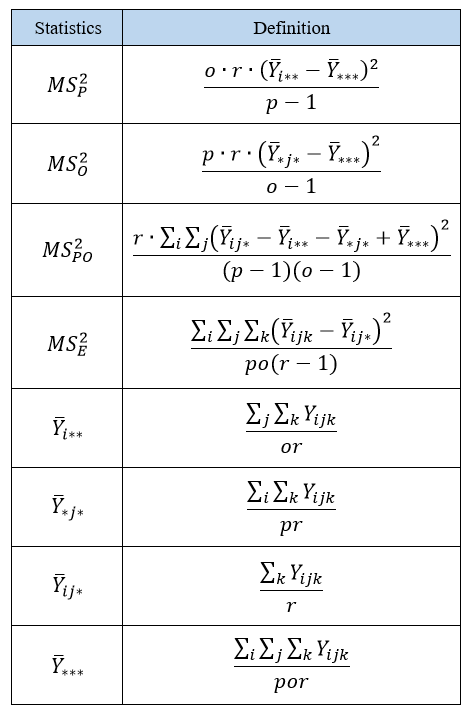
The ANOVA analysis (calculation) that is the calculation of mean-square (MS) and average values for each variation source (shown above) is as follow:
Finally, the estimation of Gauge R&R parameters, including the quantified variation from each source is presented below:
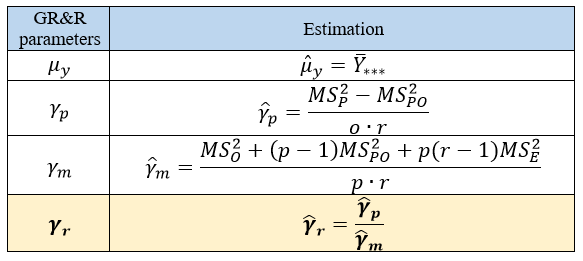
In the next section, we will discuss examples on how to interpret the results of the Gauge R&R parameters above.
Example 1: Analysis of Gauge R&R (GR&R) when the total value of GR&R variation > 20%, that is a measurement system cannot be used (is not effective) for measurement tasks at hand.
In this case, measurements of cylindrical parts with diameter between 49 mm to 51 mm by using a Vernier calliper are presented.
Before the calliper is used to measure the cylindrical parts, a Gauge R&R test is applied to the calliper to verify whether the calliper is effective and can be used to measure the diameter of the parts.
Two operators are involved to perform the Gauge R&R test and five cylindrical parts, with diameter varied between 49 mm and 51 mm, are measured to get measurement data and to perform the statistical Gauge R&R analysis. Each measurement is repeated three times.
Table 2 shows the measurement results of the five parts with three repetitions each for the Gauge R&R test.
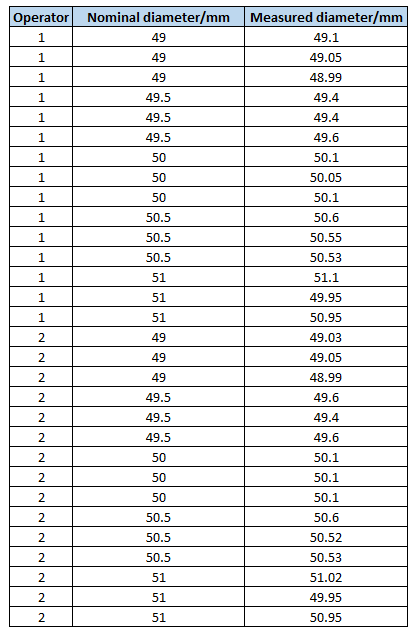
To analysis the data in table 2, the Minitab software is used to automate the calculations for the Gauge R&R test. The mathematical model is presented in the previous section.
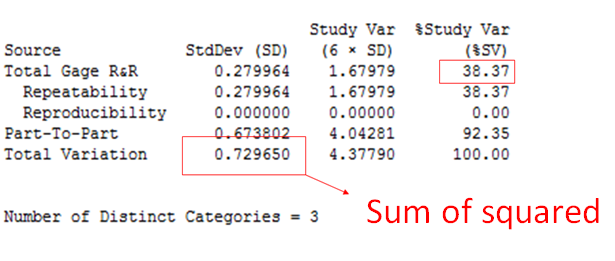
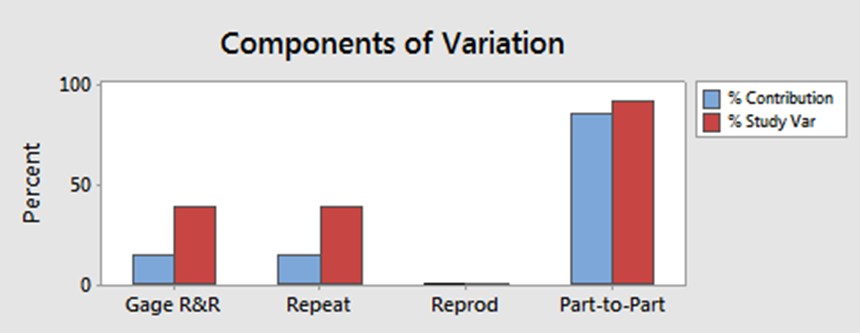
The results of the Gauge R&R test are shown in figure 1 and figure 2. In figure 2, the total Gauge R&R variation is 38.3 %.
The Gauge R&R variation contributes > 20 % to the total variation from the measurement results. In figure 2, the variations from each contribution for the cylinder measurement are shown.
Hence, we can conclude that, in this situation, the caliper cannot be used to measure the parts.
Example 2: Analysis of Gauge R&R (GR&R) when the total value of GR&R variation < 10%, that is a measurement system is effective (can be used) for measurement tasks at hand.
This example uses similar to example 1 except that in this example, a Vernier caliper with higher accuracy than the one used in example 1 is used.
The same Gauge R&R test procedure is applied for this caliper. Table 3 shows the measurement results for each part with three repetitions each.
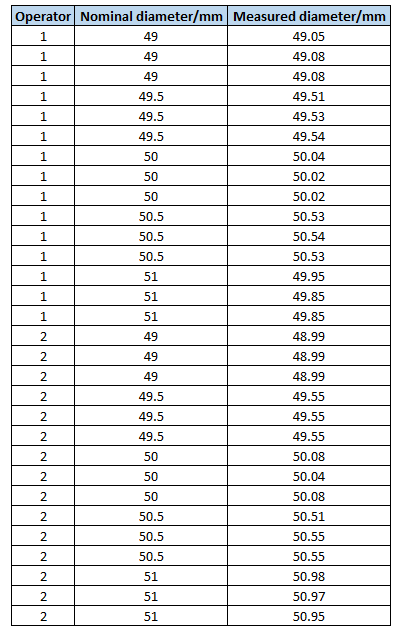
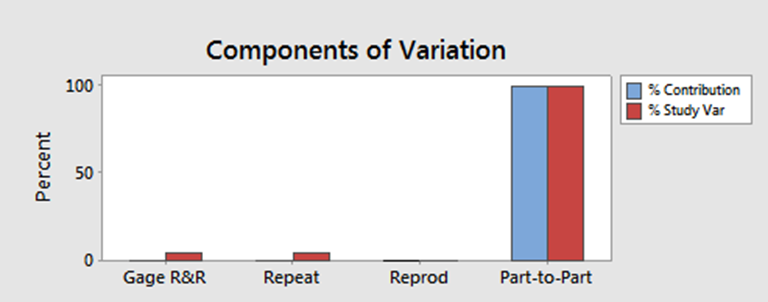
Figure 3 and figure 4 show the results of the Gauge R&R test. In figure 3, the total variation from the Gauge R&R is about 4 % and contributes to of the total variation. Figure 4 shows each variation contribution from the cylindrical part measurements in this example 2. From this figure 4, the total variation of the measurement results mostly comes from the variation of the cylindrical diameters.
In this case, we can conclude that the new caliper can be used to measure the cylindrical parts.

Conclusion
This post presents and explains Gauge R&R analysis. This test is one of the most used and important test to verify whether a measurement process (instrument, operator and procedure) is enough to perform measurements tasks at hand.
In addition, this post gives a practical introduction of the mathematical model behind Gauge R&R analysis.
Two real examples are given to clarify the Gauge R&R analysis. With these two examples, a clear understanding on how to interpret the Gauge R&R test results can be obtained.
We sell all the source files, EXE file, include and LIB files as well as documentation of ellipse fitting by using C/C++, Qt framework, Eigen and OpenCV libraries in this link.
We sell tutorials (containing PDF files, MATLAB scripts and CAD files) about 3D tolerance stack-up analysis based on statistical method (Monte-Carlo/MC Simulation).
You may find some interesting items by shopping here.