Productive metrology: Evaluating the cost of part inspections
In this third post, we will discuss how the measurement cost affects the total production cost as well as how to correctly calculate the measurement cost to support a decision making for machine selection so that we can lower the total production cost.
In this third post, we will discuss how the measurement cost affects the total production cost as well as how to correctly calculate the measurement cost to support a decision making for machine selection so that we can lower the total production cost.
In the previous post, we have discussed the relation between uncertainty and economic benefit and philosophical background of how metrology is considered to be a productive activity instead of a costly activity.
The total cost of a measurement process contains both explicit and implicit cost. Examples of explicit cost are the cost of an inspection or measuring machine purchase and the machine maintenance cost.
Meanwhile, the implicit cost requires a deep and thorough analysis since the cost estimation is based on experience, knowledge and historical data.
Let’s go into the discussion!
READ MORE: Productive metrology: The relation between uncertainty and economic benefit

The cost of inspection determines the total production cost
The total production cost of a part or product will be significantly also determined by the measurement (inspection) cost of the part or product.
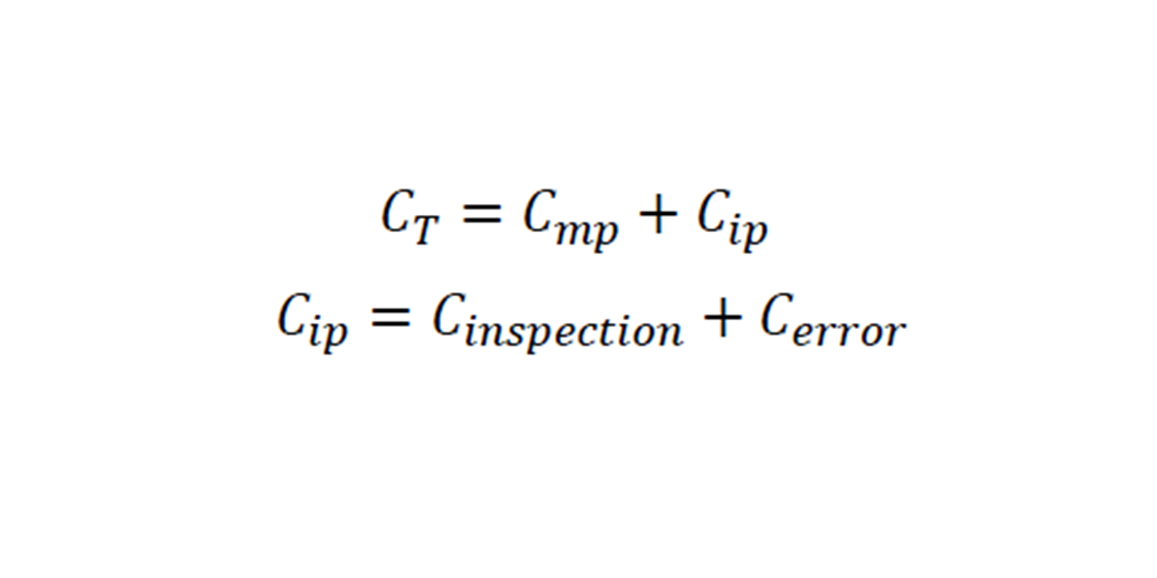
The cost of production is the accumulation of the total machinery process (including materials and labours) and the total inspection (measurement) cost. The total production cost is formulated as:

Where $C_{mp}$ is the production cost and $C_{ip}$ is the inspection cost.
Note that for the inspection cost, there are two types of cost, one is explicit and another one is implicit.
the explicit cost is the inspection cost occurs from the cost of the purchase of a measuring machine and the cost of the machine maintenance and operating cost (such as electricity and labour cost for inspection process).
Meanwhile, the implicit cost occurs from the cost of error caused from measurements.
The total inspection cost is calculated as follows:

Where $C_{inspection}$ is the measurement cost and $C_{error}$ is the error of measurement cost.
The measurement error cost is divided into two types: TYPE A and TYPE B.
TYPE A error cost is the cost that occurs due to a good part or product is scrapped so that no profit can be gained.
TYPE B error cost is the cost that occurs due to a bad part is accepted and sent to a customer. Even this type of error is more difficult to quantify as it will involve a part replacement and damage to the reputation of a company.
The total measurement cost is formulated as [1]:

Where $C_{\alpha}$ is the cost of scrapping good parts (TYPE A error) and $C_{\beta}$ is the cost of accepting/delivering bad parts (TYPE B error).
The TYPE A error is calculated as follows:

Where:
$\alpha$ is the probability of the TYPE A event occurs.
$WIP$ is work-in-process inventory.
$V_{p}$ is the value of the part.
Meanwhile, the TYPE B error is calculated as follows:

Where:
$\beta$ is the probability of the TYPE B event occurs.
$WIP$ is work-in-process inventory.
$V_{C}$ is the cost due to part replacement or reduction of customer perceptions and others. Determining of this cost is the most difficult as the cost involves expertise, experience, knowledge and historical data.
It is worth to note that both TYPE A and TYPE B error are directly affected and related to the uncertainty of measurements.
READ MORE: Productive metrology: The role of metrology to transform data into know-how or wisdom
New paradigm in evaluating the total cost of a measuring instrument
After discussing on how to calculate the total production cost of a part or product. We can then try to apply it with an example.
In this example, we fix the machinery process cost ($C_{mp}$) and try to calculate the inspection cost ($C_{ip}$).
Suppose, we are evaluating a three measurement machines/methods to be used in our production system.
The three measurement methods are:
- A: Manual measurement uses manual instruments. This method is very cheap as the cost of the manual measuring instruments are also cheap compared to automated measuring machines.
- B: This measurement uses a machinery or coordinate measuring machine (CMM) instrument but is still required operator manual operation (not fully automatic). This type of method will have higher cost compared to the manual method but is cheaper compared to a fully automatic CMM.
- C: This measurement uses a fully automatic CMM that has a high initial investment cost. In addition, the maintenance cost of this machine will be higher compared to the non-fully automatic CMM machine.
There are two paradigms in making the decision: the old and new paradigm.
The old paradigm evaluates the total inspection cost by only including the TYPE A and TYPE B measurement error costs (in this case how much saving we can get from avoiding TYPE A and TYPE B measurement errors).
The new paradigm goes beyond the TYPE A and TYPE B error cost saving than the old paradigm. This new paradigm also takes into account the intangible profits obtained from knowledge and know-how gains, quality improvement and production efficiency gain (as being discussed in the first post of productive metrology).
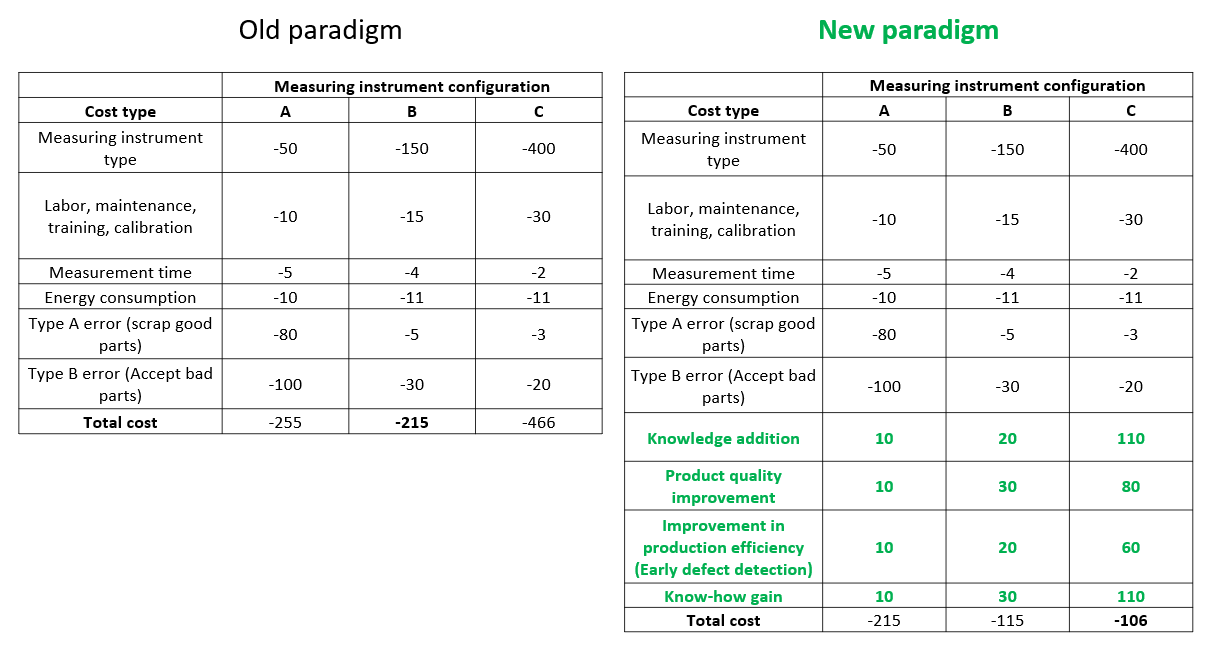
Table 1 above shows the cost comparison in evaluating what measurement machine or method to select based on the old and new paradigm.
In the old paradigm, we will select the B method since it gives the lowest total inspection cost $C_{ip}$.
However, by using the new paradigm, the C method is selected instead of the B method.
The reason is because, although, a fully automatic CMM machine has a very high initial investment cost and maintenance cost. However, this machine can bring intangible or implicit profits, such as knowledge and know-how gain to create new design or product as well as improving production efficiency and product quality.
READ MORE: The fundamental concept of metrology
Measurement reliability and early inspection are very important
As being mentioned many times, measurement uncertainty is instrumental to determine whether a measurement is reliable (can be trusted) or not.
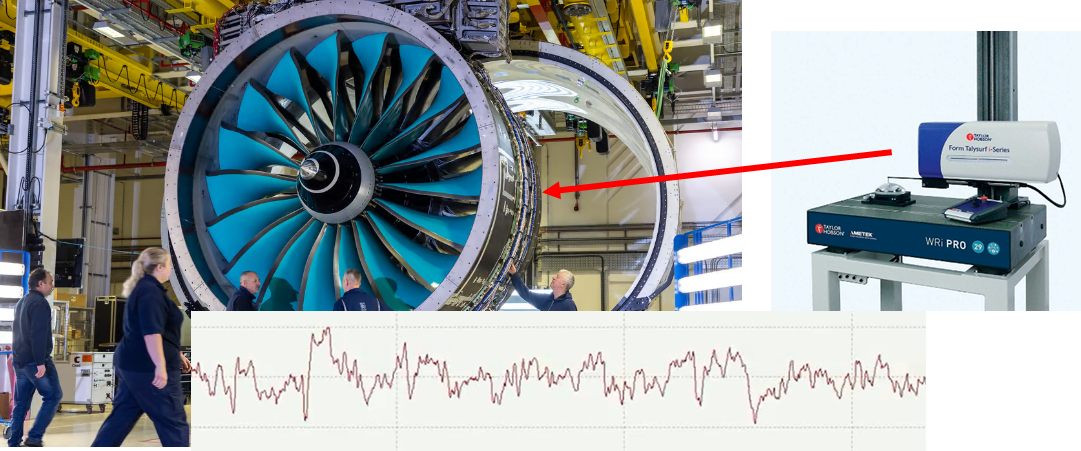
Due to this reason, in many industries that create critical parts or products, many of them still use conventional tactile instruments, such as tactile CMM to measure part geometry and tactile stylus instrument to measure surface roughness.
Figure 1 below shows the example of an aerospace jet engine manufacturer that still uses tactile stylus instruments to evaluate the roughness of the surface of the engine components.
Why do they not use optical CMM or optical surface topography measuring instruments that can measure relatively faster and provide many data in relatively short time?
The answer is that how truthful the measurement results obtained from an optical instrument can be. This is still a main research topic in metrology.
With tactile instrument, the measurement process can be faithfully or reliably modelled. The measured surface can be modelled as a circle or sphere sweeping through a profile or surface.
Hence, the results of a tactile (stylus) instrument can be compared to true results (obtained from the model) and how wrong the measurement from the true expected results can be estimated.
That is, with tactile instrument, we can know how wrong our measurement results are so that we can estimate or correct the measurement results for analysis.
Measurement uncertainty is one of the main indicators about our confidence for how wrong our measurements are.
Early measurement is very instrumental in reducing the total production cost as being discussed in the previous post.
That is, the early the defect can be detected the lower the cost will be required to fix the defect and otherwise.
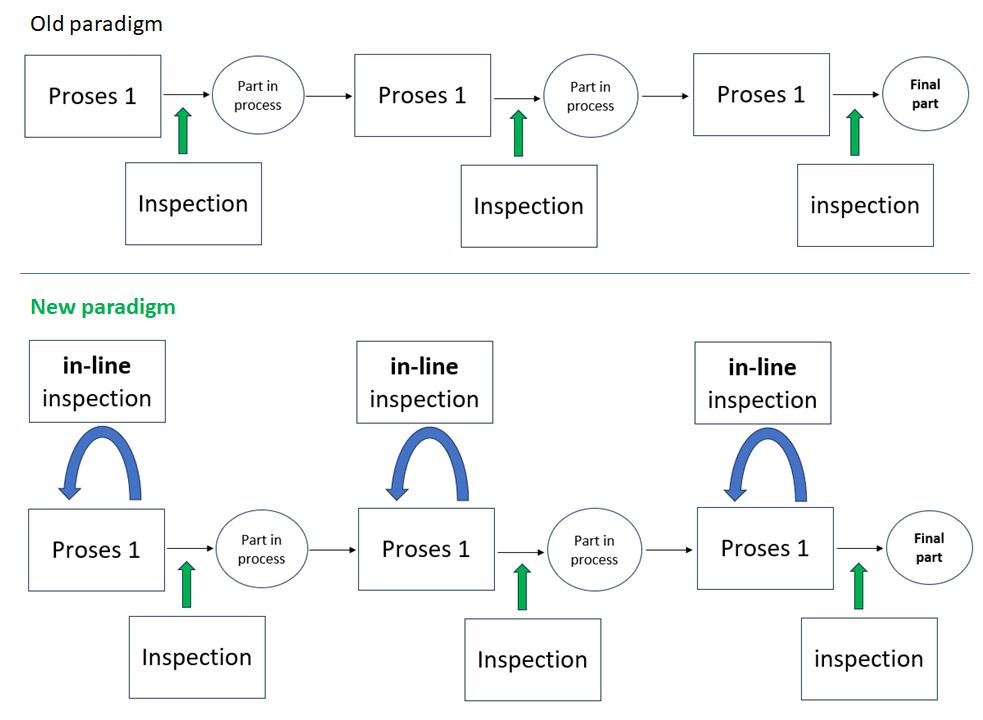
Figure 2 below shows and old and new paradigm in integrating measuring instruments in a production chain.
In the old paradigm, the measurement integration in the production chain is only at the post process step (usually in the part buffering post). This is still better than only integrating a measurement process at the last production process.
However, in the new paradigm the measurement process is integrated deeper into the process, that is in-line and in-process measurement.
Of course, this in-line and in-process measurement’s initial investment will be high.
But, many benefits can be obtained by implementing in-process measurements [2], such as: real-time feedback to production process to re-adjust the process and to avoid defected parts, error correction for the process to reduce scrapped parts, knowledge and know-how gain by getting information about the process (such as the effect of vibration to surface roughness), and information gain regarding the production process to improve the process, and many more.
READ MORE: The role of measurement uncertainty in quality inspection
Conclusion
In this post, we have discussed how to calculate the total production cost of a part or product.
The total production cost is consisted of two types of cost: the total production cost and the total inspection cost.
The total production cost includes the cost related to production machinery, materials and labour as well as inspection cost. This inspection cost includes also an intangible cost due to TYPE A and TYPE B error.
Finally, two examples of how measurement reliability and early measurement process implementation are significantly affect the safety operation of a critical product such as jet engine and significantly reduce the production cost and improve knowledge and know-how about the production process, respectively have also been presented and discussed.
Reference
[1] Kunzmann, H., Pfeifer, T., Schmitt, R., Schwenke, H. and Weckenmann, A., 2005. Productive metrology-adding value to manufacture. CIRP annals, 54(2), pp.155-168.
[2] Syam, W.P., 2020. In-process surface topography measurements. In Advances in Optical Surface Texture Metrology. IOP Publishing.
You may find some interesting items by shopping here.
- Simple rule: How to thrive in a complex world – A book explaining how we navigate in a situation or a problem, where we do not really understand, and find an effective solution.
